
11 Budget Halloween Decorations That Look Expensive
Creating an elegant Halloween home doesn’t require filling your shopping cart with expensive seasonal décor. Some of the most impressive Halloween spaces are built with simple materials, inexpensive craft supplies, thrifted pieces, and decorations you may already own.
The secret to making budget Halloween decorations look expensive is less about how much you spend and more about how you style them. A handful of pumpkins grouped together looks more intentional than individual decorations scattered around the house. Matte-black finishes can make inexpensive objects appear sophisticated, while warm lighting, dried branches, layered fabrics, and coordinated colors give a room depth and atmosphere.
You can also save money by transforming everyday objects. Glass jars become Gothic candle holders, branches become dramatic centerpieces, old frames become Halloween artwork, and inexpensive white fabric can create floating ghosts. Combined with a restrained palette such as black, cream, burnt orange, antique gold, or burgundy, these DIY touches can produce a surprisingly luxurious result.
Below are 11 budget Halloween decorations that look expensive, with step-by-step instructions and image inspiration to help you create an upscale spooky-season home without overspending.
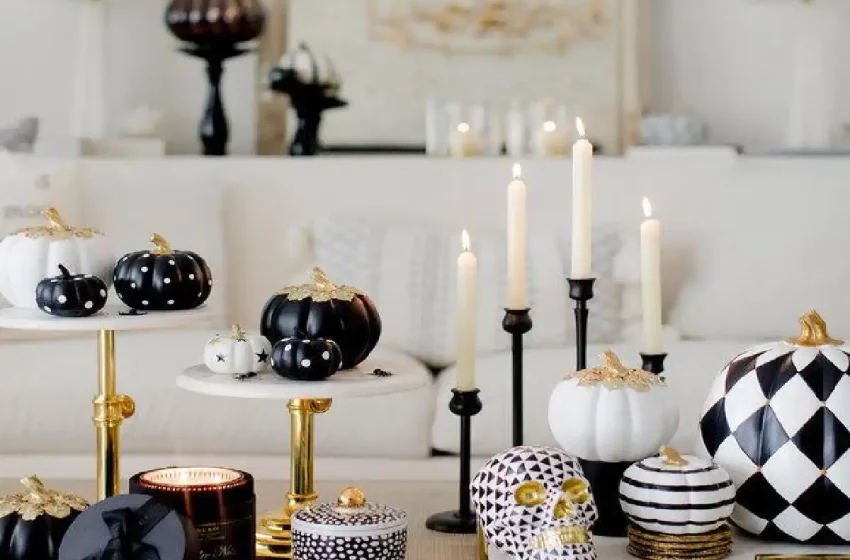
1. DIY Matte-Black Pumpkin Display
Instead of buying designer Halloween pumpkins, give inexpensive craft pumpkins a sophisticated monochrome makeover.
What You’ll Need
- Inexpensive artificial pumpkins
- Matte-black craft paint
- Paintbrush
- Antique-gold paint
- Decorative tray
- LED candles
Step-by-Step
- Clean the pumpkins and remove any dust.
- Paint several pumpkins matte black.
- Leave a few cream or white for contrast.
- Paint selected stems antique gold.
- Allow everything to dry completely.
- Arrange the pumpkins in groups of three or five.
- Place them on a wooden or black tray.
- Add warm LED candles between them.
Designer Tip: Avoid using identical pumpkins. Mixing different shapes and heights makes the display look collected rather than mass-produced.


7
2. Paper Bat Statement Wall
One of the cheapest Halloween decorations can also become one of the most dramatic.
What You’ll Need
- Black cardstock
- Bat template
- Scissors
- Removable wall adhesive
Step-by-Step
- Print or draw several bat templates in different sizes.
- Trace them onto black cardstock.
- Cut out approximately 20–40 bats, depending on the size of your wall.
- Slightly bend each bat’s wings outward.
- Start with larger bats near a fireplace, console, or sofa.
- Arrange them diagonally upward.
- Gradually switch to smaller bats.
- Leave irregular spaces so the swarm looks natural.
A large flowing arrangement looks more intentional than randomly attaching a few bats across several walls.
3. Thrifted Gothic Candle Display
Mismatched candlesticks can become a dramatic Halloween collection when they’re unified with one finish.
What You’ll Need
- Thrifted candlesticks
- Matte-black paint suitable for the material
- Flameless taper candles
- Small pumpkins
- Vintage books
Step-by-Step
- Collect inexpensive candlesticks in several shapes and heights.
- Clean them thoroughly.
- Paint them matte black if appropriate for their material.
- Allow them to dry completely.
- Arrange them in clusters rather than straight rows.
- Add flameless taper candles.
- Place vintage books underneath some holders for additional height.
- Add two or three small pumpkins.
The varying shapes create the appearance of an antique collection.
4. DIY Floating Fabric Ghosts
You don’t need expensive oversized ghost decorations to create a dramatic ceiling display.
What You’ll Need
- White gauze or lightweight fabric
- Foam balls
- Black felt
- Fishing line
- Removable hooks
Step-by-Step
- Place a foam ball beneath a square of white fabric.
- Shape the fabric around the ball to create a head.
- Leave plenty of loose material hanging underneath.
- Cut small eyes from black felt.
- Attach the eyes.
- Tie clear fishing line to the top.
- Make several ghosts in different sizes.
- Hang them at varying heights.
Use warm background lighting to create soft shadows on the fabric.


5
5. Black Branch Halloween Centerpiece
Branches gathered from outdoors or purchased inexpensively can become dramatic sculptural décor.
What You’ll Need
- Dry branches
- Matte-black paint, if desired
- Tall vase
- Paper bats
- Warm micro lights
- Mini pumpkins
Step-by-Step
- Select dry, interestingly shaped branches.
- Clean them thoroughly and allow them to dry.
- Paint them matte black if you want a dramatic finish.
- Place the branches in a tall vase.
- Hang small paper bats from a few branches.
- Wrap warm battery micro lights loosely around them.
- Arrange pumpkins around the base.
Budget Tip: If you already have an attractive neutral vase, use it instead of purchasing a Halloween-specific one.
6. DIY Vintage Halloween Gallery Wall
Printable or homemade Halloween artwork can create the appearance of an expensive vintage collection.
What You’ll Need
- Inexpensive or thrifted frames
- Halloween artwork you have permission to print
- Black or antique-gold paint
- Removable picture hooks
- Paper bats
Step-by-Step
- Collect frames in different shapes and sizes.
- Paint some black and others antique gold.
- Insert Halloween-inspired artwork.
- Arrange the frames on the floor before hanging them.
- Use one large frame as the visual anchor.
- Surround it with smaller frames.
- Add several paper bats between the artwork.
- Place a console underneath with pumpkins and candles.
This works particularly well in an entryway, hallway, or above a sofa.
7. Dollar-Store Style Skull Centerpiece
A few inexpensive skull decorations can look far more sophisticated when they’re styled with natural textures.
What You’ll Need
- Decorative skulls
- Black tray
- Dried foliage
- Mini pumpkins
- Flameless candles
- Old books
Step-by-Step
- Place a black tray on your coffee or dining table.
- Stack two old books on one side.
- Position one decorative skull on top.
- Add two or three small pumpkins.
- Place flameless candles at different heights.
- Tuck dried foliage around the objects.
- Leave part of the tray empty to avoid overcrowding.


7
8. DIY Halloween Potion Bottles
Recycle bottles and jars into an elegant witch-inspired collection.
What You’ll Need
- Empty glass bottles
- Decorative labels
- Twine
- Dark ribbon
- Water
- Food coloring, optional
- Battery candles
Step-by-Step
- Remove the original labels from your bottles.
- Wash and dry the glass thoroughly.
- Add Halloween-inspired decorative labels.
- Tie thin twine or dark ribbon around selected bottle necks.
- Leave some bottles empty and fill others with colored water for visual variation.
- Arrange them in groups of different heights.
- Add vintage books underneath.
- Place battery candles around the display.
For a polished look, use muted labels rather than brightly colored cartoon designs.
9. Budget Halloween Fireplace Mantel
A dramatic mantel can be created mainly from items used elsewhere in your home.
What You’ll Need
- Pumpkins
- Paper bats
- Black fabric
- Candlesticks
- Autumn branches
- LED candles
- Old books
Step-by-Step
- Remove everyday mantel accessories.
- Drape black fabric loosely across one side.
- Arrange pumpkins in small clusters.
- Add black candlesticks at different heights.
- Position old books underneath selected objects.
- Add dry autumn branches.
- Attach paper bats to the wall above the fireplace.
- Finish with warm LED candles.
Important: Keep fabric, paper, books, branches, and other combustible decorations safely away from active fireplaces and heat sources.
10. Elegant Halloween Entryway Using Everyday Décor
Instead of buying an entirely new collection, combine everyday pieces with a few Halloween details.
What You’ll Need
- Existing console table
- Mirror
- Black or neutral vase
- Branches
- Pumpkins
- Candles
- Black ribbon
Step-by-Step
- Clear most everyday accessories from the console.
- Keep one large mirror as the backdrop.
- Fill your existing vase with dramatic branches.
- Arrange pumpkins in one corner.
- Add two or three black candlesticks.
- Tie black velvet-style ribbon around the vase if desired.
- Add a small bat display to the wall.
- Place a basket containing blankets or additional pumpkins underneath.


6
11. Complete Budget Halloween Living Room Makeover
The biggest transformation comes from combining several inexpensive ideas rather than buying one expensive statement decoration.
What You’ll Need
- Paper bats
- DIY ghosts
- Artificial pumpkins
- Black candlesticks
- Existing neutral blankets
- Halloween pillows
- Branches
- LED candles
- Thrifted frames
Step-by-Step
- Choose a limited palette such as black, cream, and burnt orange.
- Start with your fireplace or largest wall.
- Create a flowing paper-bat display.
- Add pumpkins and black candlesticks around the fireplace.
- Hang two or three DIY floating ghosts.
- Use existing cream or neutral blankets on your sofa.
- Add only one or two Halloween-specific pillows.
- Create a branch arrangement for a side table.
- Style the coffee table with books, pumpkins, and candles.
- Add thrifted framed artwork to one wall.
- Finish by turning on warm lamps, fairy lights, and flameless candles.
The result feels cohesive because the same colors and materials appear throughout the room.


6
How to Make Cheap Halloween Decorations Look Expensive
Buying inexpensive decorations is only half the strategy. How you arrange them makes the biggest difference.
Stick to a Limited Color Palette
Choose approximately two or three dominant colors. Some combinations that work particularly well include:
- Black + cream + burnt orange
- Black + antique gold + burgundy
- Cream + beige + matte black
- Black + white + muted green
- Brown + orange + cream
Avoid mixing every Halloween color and pattern in one room if you’re trying to achieve an upscale appearance.
Decorate in Groups
Instead of scattering eight pumpkins around eight different places, arrange five together near the fireplace and three on a coffee table.
Clusters look intentional and create stronger focal points.
Mix Different Heights
Place pumpkins beside tall candlesticks, books underneath decorative objects, and branches behind smaller accessories.
Varying heights give arrangements dimension.
Use Warm Lighting
Lighting is one of the easiest ways to change how inexpensive décor looks.
Turn down harsh overhead lighting and use table lamps, warm string lights, lanterns, and flameless candles instead.
Add Natural Materials
Branches, dried foliage, pinecones, leaves, wood, and pumpkins can add texture without requiring expensive seasonal accessories.
Avoid Overdecorating
Expensive-looking interiors usually allow decorations room to stand out.
You don’t need a Halloween object on every shelf, table, and wall. Create a few strong focal points and leave breathing room around them.
Budget Halloween Decorating Plan by Room
If you’re decorating the whole home, prioritize the spaces people notice most.
Living Room: Bat wall + pumpkins + black candles + seasonal pillows.
Fireplace: Branches + pumpkins + candles + fabric.
Entryway: Tall branch arrangement + pumpkins + mirror.
Dining Room: Simple pumpkin-and-candle centerpiece.
Hallway: DIY vintage gallery wall.
Bookshelf: A few pumpkins + old books + LED candles.
Staircase: Paper bats + simple black ribbon.
Repeating the same materials throughout multiple rooms can make the entire house feel coordinated without requiring a separate collection of decorations for each area.
Halloween Decorating Safety
Budget decorating should still prioritize safety. Keep paper bats, dried branches, fabric, books, faux cobwebs, and other combustible materials away from real candles, fireplaces, heaters, and hot bulbs.
Use flameless LED candles around DIY displays whenever practical.
Make sure hanging ghosts and wall decorations are securely attached, and keep stairways, doorways, and walking paths unobstructed.
If you collect natural branches, leaves, or other materials, inspect and clean them appropriately before bringing them indoors.
Conclusion
These 11 budget Halloween decorations that look expensive prove that an impressive spooky-season home doesn’t require an equally impressive decorating bill.
Some of the most effective ideas are also among the simplest: black paper bats, painted pumpkins, thrifted candlesticks, floating fabric ghosts, branches, old frames, recycled bottles, and warm LED candles.
The biggest difference comes from styling. Choose a limited color palette, arrange decorations in groups, combine different heights and textures, and use warm lighting to bring everything together.
Rather than buying dozens of inexpensive decorations, focus on creating a few beautiful focal points. A dramatic fireplace, carefully styled entryway, candlelit coffee table, or flowing bat wall can make your entire home feel decorated.
With a little creativity, your budget Halloween décor can look polished, atmospheric, and far more expensive than it actually was.
Frequently Asked Questions
1. How can I decorate for Halloween on a small budget?
Reuse everyday home décor and add inexpensive seasonal elements such as paper bats, painted craft pumpkins, branches, DIY ghosts, printable artwork, and flameless candles.
2. How can I make cheap Halloween decorations look expensive?
Use a restrained color palette, group similar objects together, vary their heights, incorporate natural textures, and use warm accent lighting. Avoid overcrowding every surface.
3. What Halloween decorations can I make at home?
Paper bats, fabric ghosts, painted pumpkins, potion bottles, ghost garlands, branch centerpieces, Halloween artwork, and jar lanterns are relatively simple DIY possibilities.
4. What colors make Halloween décor look luxurious?
Black, cream, antique gold, burgundy, dark green, beige, white, and muted burnt orange can create an elegant Halloween palette.
5. Where should I spend money when decorating on a budget?
Prioritize versatile pieces you can reuse, such as quality flameless candles, neutral lanterns, throws, vases, or candlesticks. Then supplement them with inexpensive DIY seasonal decorations.
6. How can I decorate my living room cheaply for Halloween?
Add a paper bat wall, DIY floating ghosts, grouped pumpkins, a few black candlesticks, warm lighting, and one or two seasonal pillows. You can continue using your existing furniture and neutral textiles.
7. How can I make inexpensive pumpkins look better?
Try painting reusable craft pumpkins in matte black, cream, white, muted green, or other coordinated colors. Updating the stems with an antique metallic finish can add another polished detail.
8. What can I use instead of buying Halloween decorations?
Repurpose glass jars, bottles, old books, frames, blankets, baskets, vases, branches, ribbons, and existing fall décor.
9. Can I create elegant Halloween décor without orange?
Yes. Black and cream, black and white, burgundy and antique gold, or black and muted green can create beautiful Halloween schemes without traditional orange.
10. How do I decorate a small space on a Halloween budget?
Focus on vertical surfaces and small focal points. Paper bats, framed artwork, hanging ghosts, seasonal pillows, a small branch arrangement, and a compact pumpkin display use relatively little floor space.
11. What’s the easiest way to make my Halloween home look coordinated?
Choose one palette and repeat the same few materials throughout the house. For example, use black candlesticks, cream pumpkins, paper bats, and warm lighting in several rooms rather than giving every room a completely different theme.