
17 Halloween Entryway Decorations for a Spooky Welcome
Your entryway is the first part of your home that guests see, making it the perfect place to create a memorable Halloween welcome. Whether you prefer creepy gothic decorations, playful ghosts, traditional pumpkins or an elegant neutral display, you can transform even a small entrance without completing an expensive makeover.
The secret to an attractive Halloween entryway is layering. Begin with one focal point—such as a decorated front door, wreath or console table—and add pumpkins, lanterns, bats, branches and seasonal fabrics at different heights. Repeating two or three colors throughout the space will make the display feel coordinated instead of cluttered.
You should also keep the entrance functional. Leave a safe walking path, secure lightweight decorations against the wind and use flameless LED candles around fabric, dried leaves and children. The following 17 Halloween entryway decoration ideas include complete supplies and step-by-step instructions, allowing you to recreate each look at home.
Share
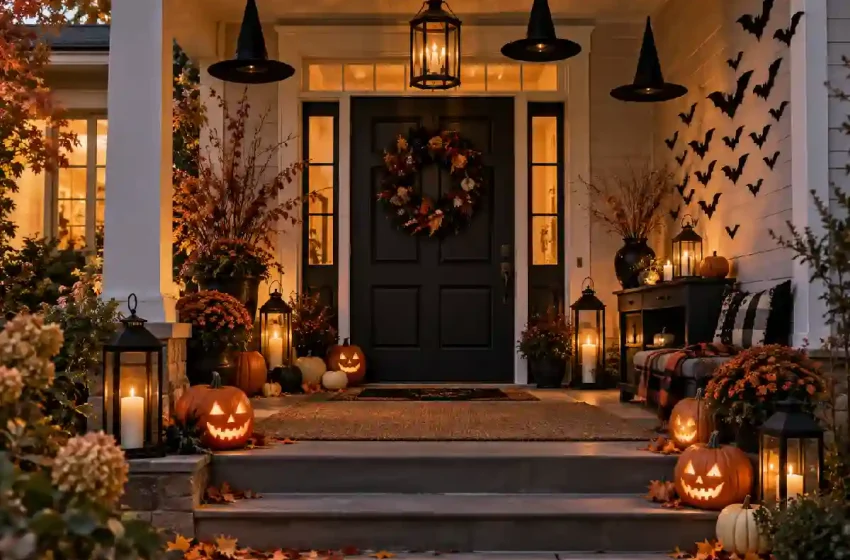
1. Layered Pumpkin and Lantern Entryway
A mixture of pumpkins and glowing lanterns creates a classic Halloween entrance that works with almost every home style.
You will need:
- Pumpkins in different colors and sizes
- Three to five black lanterns
- Flameless LED candles
- Autumn leaves or branches
- A seasonal doormat
Steps:
- Place the largest pumpkins beside the door or at the bottom of the steps.
- Fill the spaces with smaller orange, white and green pumpkins.
- Position lanterns at different heights between the pumpkins.
- Add flameless candles and turn them on before sunset.
- Scatter a few artificial autumn leaves around the arrangement.
- Finish the display with a simple Halloween doormat.
2. Flying Paper Bat Wall
A group of black bats can turn a plain wall into an eye-catching Halloween feature.
You will need:
- Black cardstock
- Bat templates
- Scissors
- Removable adhesive strips
- Pencil
Steps:
- Trace several bat shapes in small, medium and large sizes.
- Cut out the bats carefully.
- Fold each bat slightly through the center so that its wings appear raised.
- Begin attaching the bats near the console or bottom corner of the wall.
- Continue upward in a curved flight pattern.
- Use removable adhesive to avoid damaging the paint.
For the best result, position the larger bats near the bottom and smaller bats near the top. This creates a sense of distance and movement.
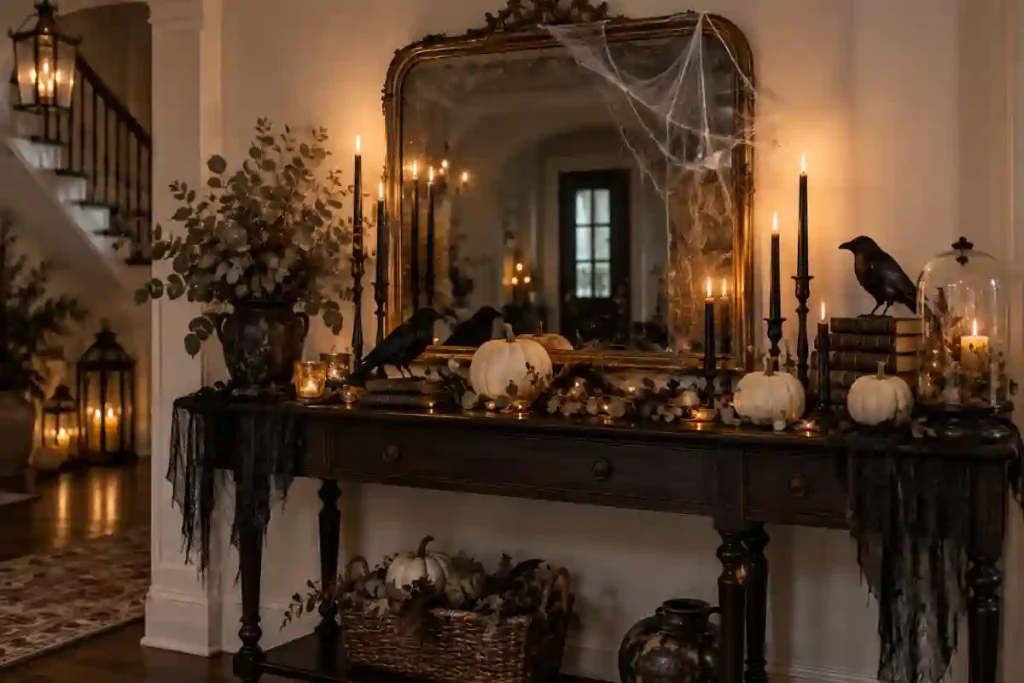
3. Spooky Halloween Console Table
An entryway console provides the perfect surface for displaying candles, pumpkins and mysterious accessories.
You will need:
- Black table runner or gauze
- White and black pumpkins
- Black candlesticks
- Flameless taper candles
- Vintage books
- Raven figurines
- Dried branches
Steps:
- Cover part of the console with loosely draped black gauze.
- Position the tallest candlesticks and branches near the back.
- Stack two or three old books to create height.
- Place pumpkins and ravens around the books.
- Add smaller decorations to fill visible gaps.
- Turn on the flameless candles for a warm, spooky glow.
Share
4. Floating Witch Hat Ceiling
Suspended witch hats create a magical effect above an entrance or covered porch.
You will need:
- Lightweight witch hats
- Clear fishing line
- Removable ceiling hooks
- Battery-operated tea lights
- Safety pins
Steps:
- Attach fishing line to the top of each witch hat.
- Cut the lines at different lengths to create varying heights.
- Place battery-powered lights inside selected hats.
- Install removable hooks above the entryway.
- Hang the hats while keeping them above head height.
- Test the arrangement from the doorway and adjust crowded areas.
Never place real candles inside the hats.
5. Creepy Cobweb Mirror
Turn an existing entryway mirror into a haunted focal point without permanently changing it.
You will need:
- Stretchable artificial cobweb
- Plastic spiders
- Removable adhesive dots
- Black ribbon
- Flameless candles
Steps:
- Clean the mirror and frame before decorating.
- Stretch a small amount of cobweb material until it becomes thin and delicate.
- Drape it over one corner of the frame.
- Attach several plastic spiders around the web.
- Tie black ribbon around one side of the frame.
- Place LED candles beneath the mirror to create eerie reflections.
Avoid covering the entire mirror. Leaving part of the glass visible makes the cobweb look more realistic.
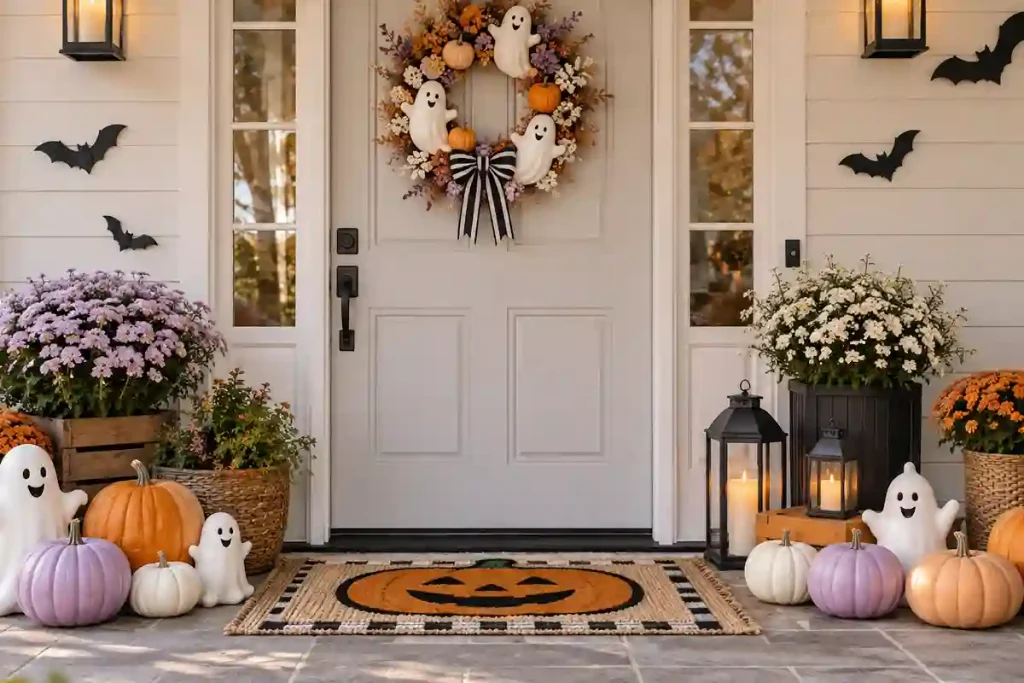
6. Ghostly White Entryway
White ghosts, pale pumpkins and soft lights provide a cute Halloween style suitable for families with young children.
You will need:
- White ceramic ghosts
- White and pastel pumpkins
- Cream-colored fabric
- Warm fairy lights
- White flowers
- Small black bats
Steps:
- Arrange the largest ghosts beside the front door.
- Group white and pastel pumpkins around their bases.
- Drape cream fabric over a bench or chair.
- Wind warm fairy lights through the pumpkin display.
- Add a few black bats to provide contrast.
- Finish with white flowers or pale dried branches.
Share
7. Haunted Portrait Gallery
Create a mysterious gallery wall with old-fashioned portraits and dark frames.
You will need:
- Printable vintage portraits
- Thrifted frames
- Black craft paint
- Removable picture strips
- Artificial cobwebs
- Small LED picture lights
Steps:
- Collect frames in several sizes and paint them black if needed.
- Print vintage portraits or Halloween silhouette artwork.
- Place each picture inside a frame.
- Arrange the frames on the floor before attaching them to the wall.
- Hang the collection with removable strips.
- Add light cobwebs and battery-operated picture lights.
Keep the display visually balanced by placing the largest portrait close to the center.
8. Black-and-Orange Entryway Bench
Decorating an existing bench is an easy way to introduce Halloween colors without filling the floor with objects.
You will need:
- Black throw blanket
- Orange and patterned pillows
- One skeleton decoration
- Mini pumpkins
- Black basket
- Warm string lights
Steps:
- Fold the black throw over one side of the bench.
- Arrange two or three pillows against the back.
- Sit the skeleton at one end for a humorous touch.
- Fill a basket with mini pumpkins and place it under the bench.
- Add string lights behind the pillows.
- Keep enough space available for guests to sit or remove their shoes.
9. DIY Cheesecloth Ghosts
Lightweight cheesecloth ghosts can be hung from the ceiling or placed around an indoor entrance.
You will need:
- Cheesecloth
- White glue
- Water
- Balloons
- Cups or bottles
- Black felt
- Fishing line
Steps:
- Inflate small balloons and position each one on top of a cup.
- Mix equal quantities of white glue and water.
- Soak the cheesecloth in the mixture and drape it over each balloon.
- Allow the ghosts to dry completely.
- Pop and remove the balloons.
- Cut eyes from black felt and attach them to the ghosts.
- Suspend the finished ghosts with fishing line.
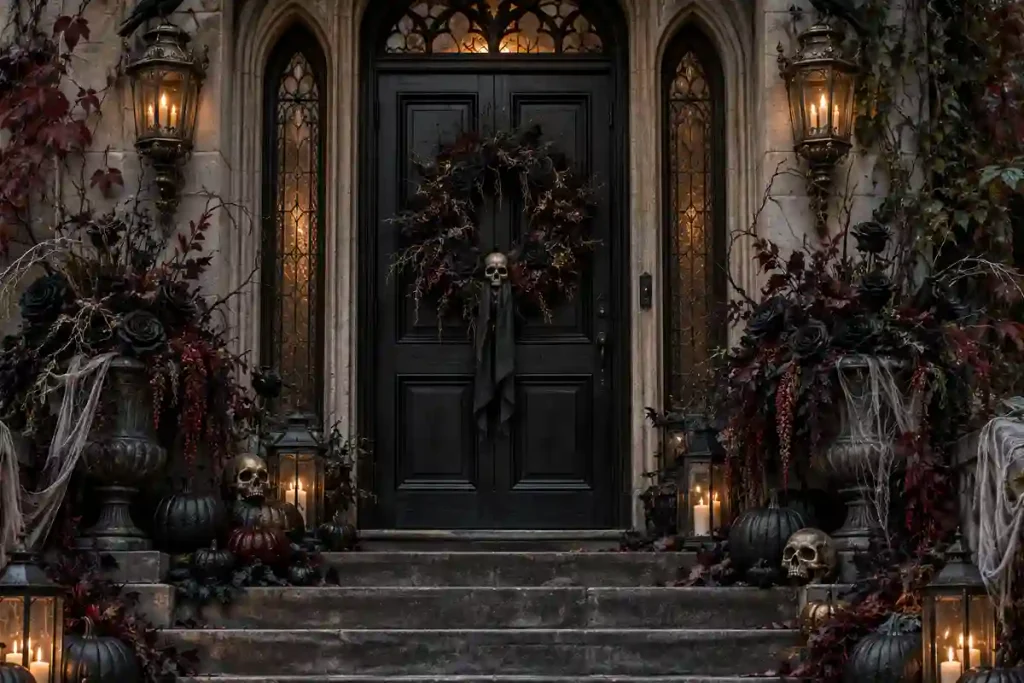
10. Gothic Black Rose Entrance
Black flowers, burgundy foliage and antique lanterns create an elegant gothic welcome.
You will need:
- Artificial black roses
- Burgundy leaves or flowers
- Large dark planters
- Black pumpkins
- Antique-style lanterns
- Dark ribbon
- Twig wreath
Steps:
- Fill the planters with black roses, branches and burgundy foliage.
- Place one planter on each side of the entrance.
- Decorate a twig wreath with matching flowers and dark ribbon.
- Hang the wreath in the center of the door.
- Arrange black pumpkins around the planters.
- Add lanterns with warm LED candles to soften the dark palette.
11. Witch’s Broom Parking Area
A small collection of broomsticks makes an amusing decoration for a narrow porch or interior foyer.
You will need:
- Three decorative broomsticks
- Wooden bucket or umbrella stand
- Black ribbon
- Artificial spiders
- Removable wall hooks
- Small pumpkins
Steps:
- Tie different black ribbons around the broom handles.
- Place the brooms inside a bucket or umbrella stand.
- Lean the container securely beside the door.
- Attach a few spiders to the handles.
- Arrange small pumpkins around the base.
- Make sure the broomsticks cannot fall across the walkway.
12. Skeleton Greeter Display
A life-size skeleton can become the amusing host of your Halloween entrance.
You will need:
- Posable skeleton
- Entryway chair or bench
- Witch hat
- Plaid blanket
- Plastic pumpkin bucket
- Battery lantern
Steps:
- Place the skeleton securely on a bench or chair.
- Position its hands naturally and add a witch hat.
- Drape a plaid blanket across its lap.
- Place a pumpkin bucket in one hand.
- Set an LED lantern beside the chair.
- Add pumpkins around the feet to connect the display with the rest of the entrance.
Keep the skeleton clear of the door and main walking route.
13. Pumpkin Arch Around the Door
A pumpkin and foliage arch creates a dramatic frame for the front door.
You will need:
- Flexible garland base
- Artificial leaves
- Lightweight foam pumpkins
- Zip ties
- Outdoor removable hooks
- Fairy lights
Steps:
- Measure the sides and top of the doorway.
- Attach foliage to the flexible garland base.
- Secure lightweight pumpkins throughout the garland with zip ties.
- Add fairy lights before installing the arch.
- Position outdoor hooks around the doorframe.
- Attach the finished garland securely and hide visible fasteners with leaves.
Use foam pumpkins instead of real ones above the doorway to reduce weight.
14. Vintage Apothecary Entry Table
Create a mysterious old-world display using bottles, labels and dried botanicals.
You will need:
- Amber and clear glass bottles
- Printable apothecary labels
- Dried herbs or flowers
- Vintage tray
- Old books
- Black candles
- Glass cloche
Steps:
- Clean the bottles and attach decorative labels.
- Fill selected bottles with colored water or dried herbs.
- Arrange them on a vintage tray.
- Add stacked books and a glass cloche.
- Position dried flowers behind the bottles for height.
- Complete the arrangement with flameless black candles.
Do not place unidentified liquids where children could reach them.
15. Budget-Friendly DIY Halloween Entryway
Paper bats, painted pumpkins and thrifted decorations can create a stylish look without a large budget.
You will need:
- Cardstock bats
- Thrift-store candlesticks
- Inexpensive pumpkins
- Black-and-white craft paint
- Wooden crates
- Twig wreath
- Warm string lights
Steps:
- Paint inexpensive pumpkins with stripes, dots or solid neutral colors.
- Stack wooden crates securely beside the wall.
- Arrange pumpkins and LED lanterns on the crates.
- Place thrifted candlesticks on the console.
- Hang a simple twig wreath on the door.
- Attach paper bats across the surrounding wall.
- Weave string lights through the display.
Share
16. Spooky Staircase Entrance
If your staircase is visible from the entryway, use it as part of the Halloween display.
You will need:
- Black gauze
- Paper bats
- Mini pumpkins
- LED candles
- Black ribbon
- Removable hooks
Steps:
- Loosely weave black gauze around the banister without covering the handrail.
- Add black ribbon at several points.
- Attach paper bats to the wall following the direction of the stairs.
- Place mini pumpkins only on wide, unused edges—not on walking surfaces.
- Position LED candles on a nearby console or stable ledge.
- Check that every stair remains fully visible and unobstructed.
17. Ultimate Halloween Entryway Display
Combine several compatible ideas to create one impressive seasonal entrance.
You will need:
- Decorated wreath
- Pumpkins in three sizes
- Two large planters
- Black lanterns
- Paper bats
- Layered doormats
- Dried branches
- Flameless candles
- One statement decoration
Steps:
- Select a limited color scheme, such as black, orange and cream.
- Hang the wreath as the central focal point.
- Position matching planters on both sides of the doorway.
- Place large pumpkins first, followed by medium and small ones.
- Add lanterns between the pumpkin groups.
- Arrange paper bats so they appear to fly away from the door.
- Layer a patterned rug beneath the doormat.
- Add one statement item, such as a skeleton, large ghost or floating witch hats.
- Turn on the lights and view the display from the street.
- Remove or reposition anything that blocks the entrance or makes the arrangement appear overcrowded.
Halloween Entryway Decorating Tips
- Choose two or three main colors to keep the entrance coordinated.
- Combine tall, medium and low decorations to create depth.
- Use odd-numbered groups of three or five pumpkins.
- Repeat the same materials on both sides without making everything perfectly symmetrical.
- Choose weather-resistant decorations for uncovered outdoor entrances.
- Secure lightweight pumpkins, bats and wreaths before windy weather.
- Use outdoor-rated extension cords and lights.
- Keep steps, handrails and doorways unobstructed.
- Replace open flames with flameless candles.
- Store delicate decorations indoors during heavy rain.
Conclusion
A Halloween entryway does not need to be complicated or expensive to make a memorable first impression. A simple arrangement of pumpkins and lanterns can provide a traditional seasonal welcome, while ghosts, flying bats or a skeleton greeter can make the entrance playful and family-friendly. For a more sophisticated atmosphere, combine black roses, antique frames, ravens and warm candlelight.
Begin with one strong focal point and build the display gradually. Repeating your chosen colors and using decorations at different heights will help everything feel connected. Most importantly, preserve a clear walking path and use secure, flameless lighting. With these 17 ideas, your entryway can welcome guests with exactly the right amount of Halloween magic.
Frequently Asked Questions
1. When should I decorate my entryway for Halloween?
Most people begin decorating during the final week of September or the first week of October. Starting early gives you several weeks to enjoy the display.
2. How can I decorate a small entryway?
Use wall and door decorations instead of taking up floor space. A wreath, paper bats, a narrow console display and hanging ghosts can create impact without blocking the entrance.
3. How can I make my Halloween entryway look elegant?
Choose a restrained palette such as black, cream and burgundy. Use matching lanterns, velvet ribbon, dark flowers and a limited number of high-quality statement pieces.
4. What are the cheapest Halloween entryway decorations?
Paper bats, cheesecloth ghosts, painted thrift-store frames, twig wreaths, recycled bottles and decorated cardboard pumpkins are inexpensive and easy to customize.
5. How do I decorate an apartment entryway?
Choose renter-friendly items such as removable wall strips, a decorative doormat, a wreath hung with an over-door hook, paper bats and a narrow console arrangement. Follow your building’s rules for shared hallways.