
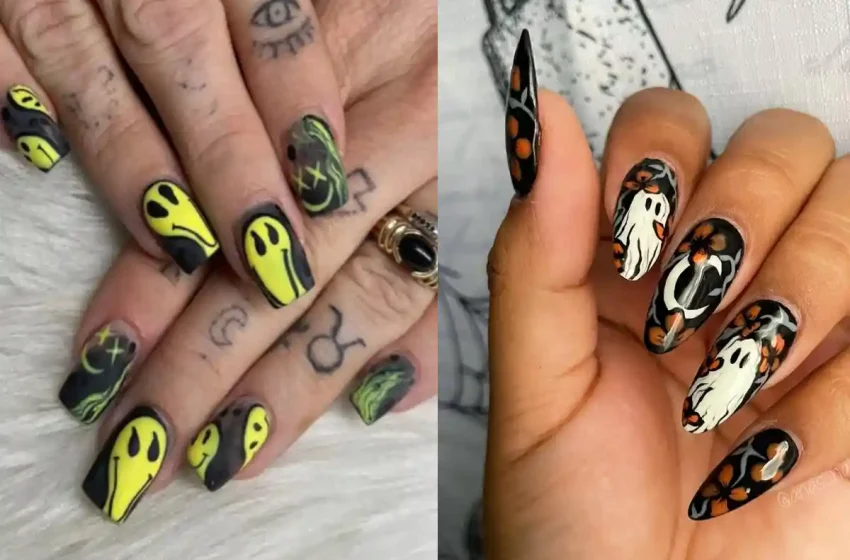
24 Ghost Nail Designs That Look Frightfully Cute
Halloween nails don’t always have to be scary. Sometimes, the cutest way to celebrate spooky season is with a tiny smiling ghost, a soft pastel spirit, or a whole little ghostly crew floating across your fingertips. Ghost nail designs are incredibly versatile because the basic shape is simple enough for beginners while still leaving plenty of room for creative details.
From minimalist nude nails and classic black-and-white ghosts to pink ghosts, glow-in-the-dark designs, French tips, glitter, chrome and 3D details, there is a ghost manicure for almost every style. Recent Halloween nail inspiration also shows ghosts being paired with celestial details, pastel colors, negative space and different finishes rather than relying only on traditional black and orange.
The best thing about ghost nail art is that it can be cute, elegant, spooky, glamorous or playful depending on the colors and expressions you choose. Even a simple white ghost with two black eyes can instantly turn an everyday manicure into a Halloween-ready look.
Below are 24 frightfully cute ghost nail designs, each with an easy step-by-step method you can recreate at home or take to your nail technician.
What You Need for Ghost Nail Art
Before starting, gather:
- Base coat
- Your preferred nail polish or gel polish
- White nail polish
- Black nail polish
- Fine nail-art brush
- Dotting tool
- Small detail brush
- Top coat
- Glitter or chrome powder, if desired
- Pink, purple, orange or pastel shades for accents
- Nail stickers or charms for advanced designs
For most ghost designs, the basic technique is surprisingly simple: create a rounded white ghost shape, add tiny black eyes, and then customize it with expressions, cheeks, bows, flowers, stars or other Halloween details.
1. Classic Cute White Ghost Nails 👻
The classic ghost manicure is the perfect place to start. A neutral or milky base lets the white ghosts stand out without making the design too busy.
How to Create It
- Apply a base coat to clean nails.
- Paint two thin coats of milky nude or sheer pink polish.
- Use a small brush to create rounded white ghost shapes.
- Give each ghost two tiny black eyes.
- Add a small black mouth if desired.
- Finish with a glossy top coat.
Best for: Beginners and everyday Halloween nails.


7
2. Ghost French Tip Nails 🖤👻
Give the traditional French manicure a Halloween makeover by turning the tips into tiny ghosts. This style has a clean, modern appearance while still feeling festive.
How to Create It
- Apply a sheer nude or pink base.
- Paint a rounded white shape across each nail tip.
- Extend the white shape slightly downward in the center.
- Create two small black eyes.
- Add tiny ghost curves at the bottom.
- Apply a glossy top coat.
Tip: Almond and coffin-shaped nails give the ghost tips plenty of space to show their shape.
3. Pink Ghost Halloween Nails 🎀
Who says Halloween has to be black and orange? Soft pink creates an adorable feminine version of ghost nail art.
How to Create It
- Apply a pastel pink base.
- Paint small white ghosts over two or three nails.
- Add black dot eyes.
- Give a few ghosts tiny pink cheeks.
- Add miniature hearts or stars.
- Finish with glossy top coat.
Pink Halloween manicures are a popular way to soften traditional spooky motifs while keeping the ghost theme recognizable.
4. Black Background Ghost Nails 🖤
White ghosts look especially striking against glossy black polish.
How to Create It
- Paint all nails glossy black.
- Let the base dry completely.
- Paint white ghost shapes at different heights.
- Add black eyes and tiny mouths.
- Add a few tiny white stars around the ghosts.
- Seal with a glossy top coat.
This high-contrast combination makes the ghosts appear to glow against the dark background.
5. Glow-in-the-Dark Ghost Nails ✨👻
Take your ghost manicure to another level with glow-in-the-dark polish.
How to Create It
- Apply a black or very dark base.
- Paint your ghost shapes using white polish.
- Apply glow-in-the-dark pigment or polish over the ghosts.
- Add black eyes after the glowing layer has dried.
- Add tiny hearts or stars.
- Finish with a suitable top coat.
The glowing effect is especially fun for Halloween parties and evening events. Glow-in-the-dark ghost designs are also a recurring variation in current ghost nail inspiration.


6
6. Ghosts With Tiny Flowers 🌸👻
For a softer look, decorate your ghosts with miniature flowers.
How to Create It
- Apply a nude or pastel pink base.
- Paint white ghosts on selected nails.
- Add black eyes.
- Use orange, pink or purple polish to create tiny flowers.
- Add green leaves around the ghosts.
- Apply a glossy top coat.
This design works particularly well with almond or stiletto nails.
7. Ghost & Pumpkin Nails 🎃
Combine two Halloween favorites in one adorable manicure.
How to Create It
- Apply a nude, orange or black base.
- Paint white ghosts on two nails.
- Paint tiny orange pumpkins on two others.
- Add black faces to the pumpkins.
- Scatter tiny stars between the characters.
- Finish with glossy top coat.
8. Ghosts With Black Spiderwebs 🕷️
If you want your manicure to feel a little spookier, add delicate spiderwebs.
How to Create It
- Paint a nude, white or pale-gray base.
- Add one or two white ghosts.
- Use a fine black brush to create spiderweb lines.
- Add a tiny black spider.
- Place a small rhinestone at the center of the web.
- Finish with top coat.
The combination of cute ghosts and spiderwebs creates a nice balance between sweet and spooky.
9. Ghost & Crescent Moon Nails 🌙
Create a magical nighttime scene across your fingertips.
How to Create It
- Paint the nails dark navy, purple or black.
- Create small white ghosts.
- Add crescent moons using pale yellow or silver.
- Paint tiny stars.
- Add small dots for distant stars.
- Finish with glossy or shimmer top coat.
10. Pastel Ghost Gang 💜🩷💚
Instead of traditional white ghosts, use several pastel colors.
How to Create It
- Paint each nail a different pastel shade.
- Create ghosts in white or contrasting pastel colors.
- Add tiny black eyes.
- Give each ghost a different expression.
- Add tiny hearts and stars.
- Seal with glossy top coat.
Pastel ghost designs are a particularly cute alternative to traditional Halloween colors and work well for both short and long nails.
11. Ghosts With Tiny Bats 🦇
Add flying bats around your ghosts for a classic Halloween atmosphere.
How to Create It
- Start with a nude or light-purple base.
- Paint small white ghosts.
- Use black polish to create tiny bats.
- Add tiny stars around them.
- Apply a glossy top coat.
12. Sleepy Ghost Nails 😴👻
Give your ghosts closed eyes for an extra-cute appearance.
How to Create It
- Apply a milky white or pale pink base.
- Paint rounded white ghosts.
- Draw two curved black lines for sleepy eyes.
- Add tiny pink cheeks.
- Draw tiny stars around them.
- Finish with glossy top coat.
This is one of the easiest ways to make a standard ghost design feel more personalized.
13. Ghost Balloon Nails 🎈
Create a playful ghost-party manicure.
How to Create It
- Apply a light nude or pastel blue base.
- Paint white ghosts.
- Draw thin black strings beneath the ghosts.
- Add tiny colorful balloon shapes.
- Add small stars or confetti.
- Finish with glossy top coat.
14. Ghosts With Orange French Tips 🧡
This design combines cute ghosts with a classic Halloween color.
How to Create It
- Apply a nude base.
- Paint bright orange French tips.
- Add tiny white ghosts over selected nails.
- Give them black eyes.
- Add tiny black bats.
- Finish with glossy top coat.
Orange-and-black French tips paired with ghosts are a simple way to make a manicure feel unmistakably Halloween.


5
15. Ghost Chrome Nails ✨
For a more glamorous look, add a chrome finish.
How to Create It
- Apply a dark or milky base.
- Paint your ghost shapes.
- Cure if using gel products.
- Apply a suitable chrome pigment to the surrounding design.
- Add black eyes to the ghosts.
- Seal with a compatible top coat.
Chrome finishes can turn simple ghost artwork into a more luxurious Halloween manicure. Ghost-and-chrome combinations are also featured among contemporary ghost nail inspiration.
16. Minimal Ghost Accent Nails 🤍
You don’t need ghosts on every nail. One tiny ghost can be enough.
How to Create It
- Paint all nails a sheer nude or milky pink.
- Choose one accent nail.
- Paint a tiny white ghost near the tip.
- Add two black eyes.
- Keep every other nail plain.
- Apply glossy top coat.
This is ideal for workplaces or anyone who prefers understated nail art. A single ghost accent is also commonly recommended as a beginner-friendly approach.
17. Ghosts With Rhinestones 💎👻
Add sparkle to make your ghost manicure party-ready.
How to Create It
- Apply black, nude or purple polish.
- Paint white ghosts.
- Add tiny black eyes.
- Place small rhinestones around selected ghosts.
- Add silver glitter to one or two accent nails.
- Seal carefully with top coat.
18. Ghosts on Milky White Nails 🤍
Create an elegant monochromatic manicure.
How to Create It
- Apply two thin layers of milky white polish.
- Paint slightly brighter white ghosts.
- Add tiny black eyes.
- Use a sheer shimmer over the background.
- Add a glossy top coat.
Because the colors are so similar, the ghosts appear subtle and sophisticated.
19. Kawaii Ghost Nails 🥰
Make your ghosts extra adorable with expressions and tiny accessories.
How to Create It
- Start with a pastel base.
- Paint chubby white ghosts.
- Give each ghost a different facial expression.
- Add pink cheeks.
- Paint tiny bows, hearts or stars.
- Finish with a glossy top coat.
20. Ghosts Peeking From the Tips 👀
Instead of painting full ghosts, let them peek over the nail edge.
How to Create It
- Apply a nude or sheer pink base.
- Paint the top portion of a white ghost at the nail tip.
- Add two black eyes.
- Leave the lower portion transparent.
- Repeat on two or three accent nails.
- Apply glossy top coat.
This negative-space approach gives the manicure a modern appearance. Similar ghost designs use small white figures emerging from the tips while keeping the rest of the nail minimal.
21. Ghosts With Purple Aura 💜
Purple gives ghost nails a dreamy, mystical feel.
How to Create It
- Apply a soft purple or lavender base.
- Add a slightly darker purple aura around selected areas.
- Paint white ghosts over the aura.
- Add black eyes.
- Add silver stars.
- Finish with glossy top coat.


6
22. 3D Ghost Charm Nails 👻✨
For a statement manicure, add raised ghost decorations.
How to Create It
- Apply your chosen acrylic or gel base.
- Paint two or three ghost designs.
- Add a small 3D ghost charm to one accent nail.
- Surround it with tiny rhinestones.
- Add glitter to neighboring nails.
- Secure the decoration properly.
- Finish the painted areas with top coat.
Tip: Keep large 3D pieces on one or two nails so the manicure remains balanced.
23. Black, White & Silver Ghost Nails 🖤🤍
This color combination creates a sophisticated Halloween manicure.
How to Create It
- Paint alternating nails black and sheer nude.
- Add white ghosts to the nude nails.
- Draw thin silver spiderwebs.
- Add small silver stars.
- Apply glossy top coat to selected nails.
- Leave some black nails matte for contrast.
24. Full Ghost Halloween Party Set 🎃👻🕷️
If you can’t choose just one design, create a mixed Halloween set featuring ghosts as the main character.
How to Create It
- Choose a palette of black, white, orange and purple.
- Paint two nails with cute white ghosts.
- Add a pumpkin to another nail.
- Create spiderwebs on another.
- Add bats and stars to the final nail.
- Include a few rhinestones or glitter accents.
- Finish the entire set with a combination of glossy and matte top coats.
The key to a mixed design is repeating the same colors throughout the manicure so all the individual elements feel connected.


7
Easy Ghost Nail-Art Technique for Beginners
If you’re new to nail art, start with the simplest ghost shape.
Step 1: Create the Body
Use a dotting tool or small brush to make a rounded white blob.
Step 2: Add the Bottom
Pull three small curves downward to create the ghost’s floating sheet-like shape.
Step 3: Add the Face
Use a tiny dotting tool to create two black eyes.
Step 4: Add Personality
Try a smile, wink, sleepy eyes or tiny pink cheeks.
Step 5: Seal It
Once the design is completely dry or cured according to your product instructions, apply top coat.
A ghost doesn’t have to be perfectly symmetrical. Slightly different shapes can actually make a group of ghosts look more playful and handmade.
Tips for Better Ghost Nail Designs
Keep the Ghosts Small
Tiny ghosts are often easier to control than large detailed figures, particularly if you’re working on short nails.
Use a Fine Detail Brush
A very thin brush makes it much easier to create the bottom curves, tiny eyes and facial expressions.
Choose Contrasting Colors
White ghosts show beautifully against black, purple, pink and darker nude backgrounds.
Don’t Overdecorate
If your ghosts are the main feature, keep supporting elements such as stars, glitter and rhinestones relatively small.
Try Different Finishes
Glossy top coat gives ghosts a polished, playful appearance, while matte finishes can make the same design look more sophisticated.
Match the Design to Your Nail Length
Short nails look great with tiny ghost accents, while long almond, coffin and stiletto nails provide more room for full scenes and detailed characters. Current ghost nail collections feature everything from short minimalist designs to dramatic elongated sets.


6
How to Make Ghost Nail Art Last Longer
- Start with clean nails and remove oils before applying polish.
- Always use a base coat to improve adhesion and help protect the natural nail.
- Apply thin layers instead of one thick layer.
- Allow each layer to dry or cure properly according to the product instructions.
- Seal the free edge with top coat when possible.
- Avoid picking or peeling at the artwork.
- Wear gloves for household cleaning to reduce unnecessary exposure to water and chemicals.
- Remove gel or acrylic products properly rather than pulling them from the natural nail.
Which Ghost Nail Design Should You Choose?
| If You Want… | Try… |
|---|---|
| A beginner design | Classic Cute White Ghosts |
| Something subtle | Minimal Ghost Accent |
| A cute manicure | Pink Ghosts |
| A dramatic look | Black Background Ghosts |
| Party nails | 3D Ghost Charms |
| Glamorous nails | Ghost Chrome |
| Short nails | Tiny Ghost Accents |
| Long nails | Ghost & Halloween Scene |
| A magical look | Ghosts & Crescent Moons |
| A trendy design | Ghost French Tips |
| Something playful | Kawaii Ghosts |
| Something spooky | Ghosts & Spiderwebs |
Conclusion
Ghost nail designs are one of the easiest ways to create a Halloween manicure that feels spooky without being scary. Their simple shapes make them accessible for beginners, while endless combinations of colors, finishes and decorations give experienced nail artists plenty of room to experiment.
You can keep things minimalist with one tiny ghost on a nude nail, create a cute pastel ghost family, or go all-out with black backgrounds, spiderwebs, glitter, chrome, pumpkins and 3D charms.
Whether you’re preparing for a Halloween party or simply want a little spooky detail for October, these 24 ghost nail designs offer plenty of inspiration. Pick your favorite ghost personality, choose a color palette and let your fingertips get a little haunted. 👻💅
FAQ
1. Are ghost nails easy to do at home?
Yes. Basic ghost designs are beginner-friendly because the body can be created using a simple rounded shape followed by two small black eyes.
2. What colors look best with ghost nails?
White ghosts work beautifully with black, nude, pink, purple, orange, navy and pastel backgrounds. For a softer look, try pink or lavender. For dramatic Halloween nails, choose black or deep purple.
3. Can I do ghost nail art on short nails?
Absolutely. Tiny ghost accents, French-tip ghosts and minimalist designs work particularly well on short nails.
4. What nail shape is best for ghost designs?
Almost any shape works. Almond, coffin and stiletto nails provide more space for detailed artwork, while round and short square nails are excellent for tiny ghost accents.
5. How do I make ghost nail art look cute?
Give your ghosts tiny smiles, sleepy eyes, pink cheeks, bows, hearts or different facial expressions. A pastel base can also make the design look softer.