
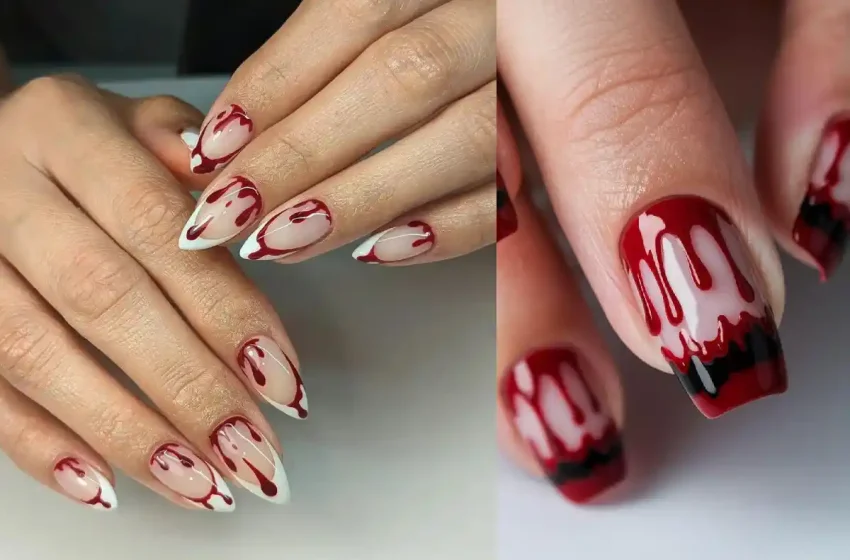
18 Blood Drip Nails for a Dramatic Halloween Look
Halloween is the perfect time to take your manicure to the dark side. 🩸🖤 Blood drip nails are one of the most dramatic Halloween nail trends, combining rich red shades with black, nude, white, or deep burgundy backgrounds for a creepy yet stylish finish.
Whether you want subtle bloody French tips, glossy dripping red nails, vampire-inspired designs, or a full horror-themed manicure, there are plenty of ways to customize this look. The best part is that many blood-drip designs can be created at home using a fine nail-art brush, dotting tool, and a few Halloween-friendly polish shades.
From elegant crimson drips to spooky chrome finishes, these 18 blood drip nail designs will give your Halloween manicure a bold, mysterious, and unforgettable look.
1. Classic Red Blood Drip Nails
The classic red-on-nude combination is an easy way to create the iconic blood-drip effect.
What You’ll Need
- Nude nail polish
- Deep red nail polish
- Fine nail-art brush
- Dotting tool
- Base coat
- Glossy top coat
Step-by-Step
- Shape and buff your nails.
- Apply a base coat.
- Paint two coats of nude polish and let them dry.
- Use a fine brush to paint a red line across the upper portion of the nail.
- Create several uneven drips extending downward.
- Use a dotting tool to round the ends of the drips.
- Fill the shapes with red polish.
- Finish with a glossy top coat.


6
2. Black and Blood Red Nails
Black creates a dramatic background that makes crimson drips stand out beautifully.
Step-by-Step
- Apply a black base coat.
- Add a second layer for an opaque finish.
- Let the polish dry completely.
- Use deep-red polish to create a line near the tip.
- Paint uneven drips from the line.
- Add different drip lengths for a natural effect.
- Seal with glossy top coat.
3. Bloody French Tip Nails
Give your French manicure a creepy Halloween makeover.
Step-by-Step
- Apply a sheer nude or pink base.
- Create a thin red French tip.
- Extend small red drips from different points of the tip.
- Make a few drips longer than others.
- Add a glossy top coat.
- Keep the remaining nail mostly clean for an elegant contrast.


7
4. Dark Burgundy Blood Drip Nails
Burgundy creates a sophisticated alternative to bright red.
Step-by-Step
- Apply a nude or deep-black base.
- Choose a dark burgundy polish.
- Paint a curved line near the nail tip.
- Create several rounded drips.
- Add a few tiny droplets near the main design.
- Apply a high-shine top coat.
5. Vampire Blood Drip Nails
Create a vampire-inspired manicure using black, crimson, and deep burgundy.
Step-by-Step
- Paint alternating nails black and deep burgundy.
- Choose two nude accent nails.
- Add crimson blood drips to the nude nails.
- Paint tiny vampire-inspired details on another nail.
- Add subtle red glitter if desired.
- Finish with a glossy top coat.


8
6. Bloody Chrome Nails
Chrome finishes give blood-drip nails a futuristic and dramatic appearance.
Step-by-Step
- Apply a black or dark burgundy base.
- Allow it to dry completely.
- Apply chrome powder according to the product instructions.
- Seal the chrome finish.
- Paint glossy red drips over the chrome surface.
- Add another layer of top coat to protect the design.
7. White and Red Blood Drip Nails
A white background makes the red design look especially bold.
Step-by-Step
- Apply two coats of white polish.
- Allow the surface to dry.
- Paint a horizontal red line near the tip.
- Add long and short red drips.
- Use a dotting tool to round each drip.
- Clean around the edges.
- Finish with glossy top coat.


7
8. Matte Black Nails With Glossy Blood Drips
Mixing matte and glossy textures creates a sophisticated horror-inspired look.
Step-by-Step
- Paint all nails black.
- Apply a matte top coat.
- Let the surface dry completely.
- Use glossy red polish to create the blood-drip design.
- Keep the red areas shiny while leaving the black background matte.
- Add a small red accent to one or two nails.
9. Long Coffin Blood Drip Nails
Long coffin nails provide plenty of space for dramatic dripping designs.
Step-by-Step
- Shape your nails into a coffin or tapered square shape.
- Apply a nude or translucent base.
- Create a deep-red line near the top.
- Paint several long drips toward the middle of the nail.
- Vary the length and width of each drip.
- Add tiny red droplets around the design.
- Finish with a glossy top coat.


7
10. Blood Drip and Spiderweb Nails
Combine two classic Halloween motifs for a spooky statement manicure.
Step-by-Step
- Paint your nails black or nude.
- Create red blood drips on two or three nails.
- Use a thin white brush to draw spiderwebs on the remaining nails.
- Add a tiny black spider if desired.
- Apply top coat carefully.
11. Glitter Blood Drip Nails
Add glitter for a glamorous twist on traditional Halloween nail art.
Step-by-Step
- Apply a black, nude, or burgundy base.
- Paint your blood-drip design using deep red polish.
- Add fine red or holographic glitter while the red polish is slightly tacky.
- Carefully remove excess glitter.
- Apply a thick glossy top coat.


5
12. Red and Black Ombre Blood Drips
An ombré background gives the manicure extra depth.
Step-by-Step
- Apply a nude base.
- Use a makeup sponge to blend black and burgundy toward the nail tips.
- Dab lightly until the transition looks smooth.
- Let the ombré dry.
- Add glossy red blood drips.
- Finish with top coat.
13. Minimalist Blood Drip Nails
You don’t need a dramatic full manicure to get the Halloween effect.
Step-by-Step
- Apply a sheer nude base.
- Choose one or two accent nails.
- Paint a very thin red line near the tip.
- Add only two or three tiny drips.
- Leave plenty of negative space.
- Finish with a glossy top coat.


5
14. Bloody Almond Nails
Almond-shaped nails pair beautifully with elegant but spooky blood-drip details.
Step-by-Step
- Shape the nails into a soft almond form.
- Apply a pale nude or beige base.
- Paint a thin crimson line across the tips.
- Create rounded drips of different sizes.
- Add one or two tiny droplets.
- Seal with a glossy finish.
15. Deep Crimson Stiletto Blood Nails
For a bold Halloween manicure, combine sharp stiletto nails with dark crimson polish.
Step-by-Step
- Shape your nails into a stiletto style.
- Apply deep crimson polish.
- Use black polish to create a contrasting base on selected nails.
- Add glossy red drips over the black nails.
- Add subtle metallic accents if desired.
- Finish with a durable top coat.


6
16. Blood Drips With Tiny Halloween Details
Add tiny bats, moons, stars, or spiders around the dripping design.
Step-by-Step
- Start with a nude, black, or burgundy base.
- Paint crimson blood drips on selected nails.
- Use a fine brush to add tiny bats or stars.
- Add miniature spiders or moons to the accent nails.
- Keep the details small so the blood-drip effect remains the focal point.
- Finish with top coat.
17. Bloody Red French Fade
This elegant design combines a soft French fade with dramatic crimson details.
Step-by-Step
- Apply a sheer pink or nude base.
- Create a subtle white French fade.
- Let the base dry.
- Add a thin crimson line near the tip.
- Pull several drips downward.
- Add tiny red dots for additional detail.
- Seal with a glossy top coat.


5
18. Ultimate Dramatic Blood Drip Halloween Nails
For the ultimate Halloween statement, combine several spooky finishes into one manicure.
Step-by-Step
- Use a combination of black, nude, and burgundy bases.
- Add glossy crimson blood drips to multiple nails.
- Create a spiderweb on one accent nail.
- Add tiny bats or stars to another.
- Use a matte finish on some nails and glossy finish on others.
- Add subtle red glitter to the blood details.
- Finish with a durable top coat.
- Let the manicure fully cure before exposing it to water or friction.
8
Tips for Perfect Blood Drip Nail Art
Use Different Drip Lengths
Avoid making every drip identical. A mixture of short, medium, and long drips creates a more natural liquid effect.
Use a Dotting Tool
A dotting tool makes it easier to create rounded drip ends.
Choose the Right Red
For a dramatic Halloween look, deep crimson, wine, burgundy, or dark cherry shades work particularly well.
Keep the Base Clean
A nude, white, or black background makes the red details stand out much more.
Add Gloss Strategically
Glossy red against a matte black background creates an especially striking contrast.
Let Each Layer Dry
Allowing each layer to dry before adding details helps prevent smudging and keeps the drip shapes crisp.
Conclusion
Blood drip nails are the perfect choice when you want your Halloween manicure to feel dramatic, dark, and unforgettable. 🩸🖤 Whether you prefer minimalist crimson drips, bloody French tips, vampire-inspired designs, glossy chrome nails, or an elaborate horror-inspired set, these 18 ideas offer plenty of inspiration.
For an elegant look, try burgundy drips on nude almond nails. If you want maximum impact, combine black, crimson, glitter, spiderwebs, and dramatic nail shapes. With the right colors and a little patience, you can create a Halloween manicure that looks straight out of a spooky salon.
FAQ
1. What colors are best for blood drip nails?
Deep red, crimson, burgundy, wine, and dark cherry shades work especially well. Black, white, nude, and beige make excellent contrasting backgrounds.
2. Are blood drip nails difficult to create?
Not necessarily. The basic design is beginner-friendly. A fine nail-art brush can create the dripping lines, while a dotting tool helps make rounded drip ends.
3. What nail shape works best for blood drip designs?
Blood drips look great on almond, coffin, square, stiletto, and oval nails. Longer nails provide more space for dramatic drips, while short nails work beautifully with minimalist versions.
4. Can I create blood drip nails on short nails?
Yes! Use shorter drips and focus on one or two accent nails. Nude bases with tiny crimson drips are particularly flattering on short nails.
5. How can I make blood drips look realistic?
Use different drip lengths and widths rather than making them identical. Adding a few small droplets around the main design can also create a more fluid appearance.