
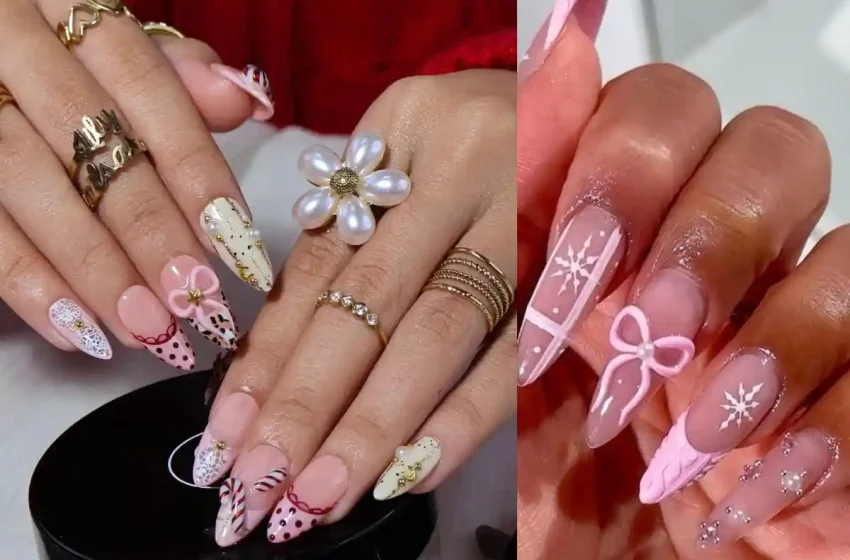
21 Cute Christmas Coquette Nails Everyone Will Love
Christmas is the perfect time to embrace all things pretty, festive, and romantic—and what better way to do that than with Christmas coquette nails? Inspired by delicate bows, soft pink shades, tiny pearls, lace details, sparkling rhinestones, and classic holiday colors, this nail trend brings a sweet and feminine touch to your seasonal look.
Whether you love a subtle manicure or enjoy detailed nail art, there are so many beautiful ways to give your nails a coquette Christmas makeover. Think milky-white bases with tiny red bows, pink French tips with snowflakes, candy cane stripes, glittery accents, and elegant pearl details.
The best part? You don’t need extremely long nails or complicated designs to enjoy this trend. Many of these ideas look just as lovely on short, natural nails as they do on long almond or coffin-shaped nails.
If you’re looking for inspiration for your next holiday manicure, here are 21 cute Christmas coquette nail ideas that are romantic, festive, and absolutely Instagram-worthy.
1. Pink Christmas Bow Nails
Pink Christmas bow nails are one of the prettiest ways to embrace the coquette aesthetic. A soft blush-pink base creates a delicate background, while tiny red bows add a festive touch.
How to create this look:
- Shape your nails into a soft almond or oval shape.
- Apply a clear base coat and let it dry.
- Paint your nails with two coats of sheer blush-pink polish.
- Use a fine nail-art brush to draw tiny red bows.
- Add a small white or silver dot in the center of each bow.
- Finish with a glossy top coat.
Best for: Romantic Christmas outfits and feminine holiday looks.
2. Red Velvet Coquette Nails
Deep red velvet nails look luxurious, festive, and wonderfully romantic. The shimmering velvet effect gives your manicure a soft, glowing finish, while a little bow detail makes it unmistakably coquette.
How to create this look:
- Prep your nails and apply a base coat.
- Apply a deep burgundy or wine-red gel polish.
- Add a magnetic velvet or cat-eye gel effect using a nail magnet.
- Cure according to your gel polish instructions.
- Add a tiny bow accent to one or two nails.
- Seal everything with a compatible top coat.
Best for: Christmas parties and elegant evening celebrations.
3. Milky White Snowflake Nails
If you prefer something soft and elegant, milky-white snowflake nails are a beautiful choice. Their sheer finish looks clean and delicate, while tiny snowflakes create a magical winter-inspired design.
How to create this look:
- Apply a nourishing base coat.
- Paint your nails with two thin coats of milky-white polish.
- Use a fine brush to create tiny white or silver snowflakes.
- Add a few miniature pearl accents.
- Apply a glossy top coat for a smooth finish.
Best for: Minimalist nail lovers who still want a festive manicure.
4. Candy Cane Pink French Tips
Give the traditional French manicure a Christmas makeover with pink bases and candy cane-inspired tips. The combination of pink, red, and white creates a playful yet sophisticated design.
How to create this look:
- Apply a sheer pink base coat.
- Allow it to dry completely.
- Paint a thin white French tip on each nail.
- Add tiny diagonal red stripes over the white tips.
- Clean up the edges with a small brush.
- Finish with a high-shine top coat.
Best for: Anyone who loves classic French tips with a festive twist.
5. Christmas Pearl Bow Nails
Pearls and bows are a perfect match for the coquette trend. This design looks especially beautiful with a nude-pink or creamy-white base and delicate pearl decorations.
How to create this look:
- Apply a pale pink or nude base color.
- Paint small white bows on two accent nails.
- Use nail adhesive to attach miniature flat-back pearls.
- Arrange the pearls in small clusters or along the nail edges.
- Apply a suitable top coat, avoiding bulky layers over raised decorations.
Best for: A romantic and elegant Christmas manicure.
6. Pink Glitter Christmas Nails
For anyone who loves a little sparkle, pink glitter nails are a gorgeous holiday option. Soft pink polish combined with shimmering glitter and delicate bow accents creates a dreamy festive manicure.
How to create this look:
- Apply a base coat.
- Paint your nails with a pale pink polish.
- Add fine pink or silver glitter to selected nails.
- Draw tiny bows using white or red nail paint.
- Add small rhinestones for extra sparkle.
- Seal with a glossy top coat.
Best for: Christmas dinners, parties, and New Year’s celebrations.
7. Red and White Coquette Nails
Red and white are timeless Christmas colors. When combined with little bows, hearts, and delicate patterns, they create a cheerful manicure that feels both classic and feminine.
How to create this look:
- Paint alternating nails in soft white and cherry red.
- Add small white polka dots to the red nails.
- Draw tiny red bows on the white nails.
- Add miniature heart details if desired.
- Finish with a glossy top coat.
Best for: A classic Christmas look with a cute coquette twist.
8. Pink Plaid Christmas Nails
Plaid patterns bring cozy winter charm to your manicure. A pink, red, and white color palette makes this traditional pattern look softer and more romantic.
How to create this look:
- Apply a pale pink base coat.
- Use a thin nail-art brush to draw vertical red lines.
- Add horizontal red lines to create a plaid pattern.
- Add thinner white lines between the red stripes.
- Leave some nails plain pink with tiny bow accents.
- Finish with a glossy top coat.
Best for: Cozy Christmas sweaters and winter outfits.
9. Christmas Cherry Nails
Cherry nail art is playful, sweet, and perfect for a cute holiday manicure. Tiny red cherries with green stems look adorable against a sheer pink background.
How to create this look:
- Apply two coats of sheer pink polish.
- Use a dotting tool to create pairs of small red circles.
- Connect each pair with thin green stems.
- Add tiny white highlights to the cherries.
- Place a miniature bow on one accent nail.
- Apply a glossy top coat.
Best for: Fun, youthful Christmas nail designs.
10. White Lace Christmas Nails
Inspired by delicate lace fabrics, this manicure is perfect for anyone who loves soft, vintage-inspired details. Fine white patterns over a pink or nude base create an elegant and romantic finish.
How to create this look:
- Apply a sheer nude-pink base.
- Use a very fine brush or lace nail stamping plate.
- Create delicate white lace patterns on one or two nails.
- Keep the remaining nails simple with tiny pearl accents.
- Add a small white bow to an accent nail.
- Finish with a clear top coat.
Best for: Elegant Christmas gatherings and romantic winter looks.
11. Gold Bow Christmas Nails
Gold bow nails are a lovely choice if you want your Christmas manicure to feel glamorous without being too bold. A nude or champagne base keeps the design elegant, while metallic bows add a festive shine.
How to create this look:
- Apply a nude or champagne-colored base.
- Paint tiny bows using metallic gold nail polish.
- Add gold foil or subtle glitter to one accent nail.
- Keep the other nails simple and glossy.
- Seal with a top coat.
Best for: Elegant holiday parties and special occasions.
12. Gingerbread Coquette Nails
Gingerbread nail art adds a sweet, cozy touch to Christmas. Little gingerbread figures, white icing details, and pink bows make this design especially adorable.
How to create this look:
- Apply a pale cream or blush-pink base.
- Use caramel-brown polish to paint tiny gingerbread shapes.
- Add white dots and lines to resemble icing.
- Draw miniature red or pink bows.
- Add small white snowflakes to the remaining nails.
- Finish with a glossy top coat.
Best for: Cute holiday outfits and Christmas baking days.
13. Baby Pink Snowflake French Nails
This design combines the elegance of French tips with the softness of baby pink and the beauty of winter snowflakes. It is subtle enough for everyday wear but still feels festive.
How to create this look:
- Apply a sheer pink base coat.
- Create delicate white French tips.
- Paint small snowflakes on one or two accent nails.
- Add a tiny silver rhinestone to the center of each snowflake.
- Apply a glossy top coat.
Best for: Short and medium-length almond nails.
14. Red Bow Chrome Nails
Chrome nails are a great way to add a modern touch to a romantic design. A reflective silver or pearly base paired with red bows makes this manicure eye-catching and festive.
How to create this look:
- Apply a compatible gel base and cure.
- Apply a suitable chrome-compatible base color.
- Rub pearly or silver chrome powder over the surface as directed by the product.
- Add tiny red bow designs.
- Seal with the recommended top coat.
Best for: Bold holiday nail looks and festive photos.
15. Christmas Polka Dot Coquette Nails
Polka dots are simple, playful, and surprisingly stylish. Red and white dots over a pink base create a cheerful design that looks especially cute on short, rounded nails.
How to create this look:
- Apply a pale pink base.
- Use a dotting tool to create tiny red and white dots.
- Add a bow accent to one nail.
- Keep the dot pattern evenly spaced.
- Finish with a smooth top coat.
Best for: Short nails and easy DIY Christmas nail art.
16. Frosted Pink Christmas Nails
Frosted pink nails have a soft, icy glow that looks beautiful during the winter season. Add delicate snowflakes and pearl details for an elegant coquette finish.
How to create this look:
- Apply a pale pink base color.
- Add a layer of fine iridescent shimmer polish.
- Paint small white snowflakes on selected nails.
- Add tiny pearls near the cuticle area.
- Finish with a glossy or softly pearlescent top coat.
Best for: Anyone who loves subtle winter sparkle.
17. Christmas Gift Ribbon Nails
Inspired by beautifully wrapped Christmas presents, this design features delicate ribbon lines and tiny bows. It is festive, creative, and perfect for the coquette aesthetic.
How to create this look:
- Paint your nails with a sheer pink or milky-white polish.
- Use red or burgundy polish to draw thin ribbon lines.
- Add little bow shapes where the lines meet.
- Use gold polish for tiny decorative accents.
- Apply a glossy top coat.
Best for: Christmas gift exchanges and holiday celebrations.
18. Burgundy French Coquette Nails
Burgundy French tips are a sophisticated alternative to bright red. Paired with nude-pink bases and delicate bows, they create a chic manicure that feels festive without looking overly decorative.
How to create this look:
- Apply a sheer nude-pink base.
- Paint deep burgundy French tips.
- Add tiny matching bows to one or two accent nails.
- Apply a subtle shimmer layer if desired.
- Seal with a glossy top coat.
Best for: A sophisticated Christmas manicure.
19. Pastel Christmas Tree Nails
Who says Christmas trees have to be green? Pastel pink Christmas trees look dreamy and adorable, especially when decorated with tiny pearls, glitter, and bows.
How to create this look:
- Apply a pale pink or milky-white base.
- Use a fine brush to create small triangular Christmas trees.
- Decorate the trees with tiny white or silver dots.
- Add a small bow or star at the top.
- Finish with a glossy top coat.
Best for: Cute, creative, and playful holiday manicures.
20. Nutcracker Pink Christmas Nails
Nutcracker-inspired nails bring a charming vintage Christmas feeling to your manicure. Soft pink, red, white, and gold details create a decorative look that feels like a festive fairytale.
How to create this look:
- Apply a pale pink base to most nails.
- Paint one accent nail in a creamy-white shade.
- Use fine brushes to create tiny nutcracker-inspired details.
- Add gold stars, red bows, and miniature decorative dots.
- Seal with a glossy top coat.
Best for: Anyone who loves detailed, statement-making Christmas nail art.
21. Classic Coquette Christmas Mix-and-Match Nails
Can’t decide on just one design? Mix-and-match nails let you enjoy all your favorite Christmas details in one manicure. Combine bows, pearls, snowflakes, candy cane stripes, and glitter for a beautiful festive collection.
How to create this look:
- Choose a coordinated palette of blush pink, white, and cherry red.
- Paint each nail with a different base shade.
- Add bows to two nails.
- Create snowflakes or candy cane stripes on two others.
- Add pearls, glitter, or rhinestones to the remaining nails.
- Finish with a glossy top coat to bring the whole look together.
Best for: Anyone who wants a fun, full Christmas coquette manicure.
Tips for Making Your Christmas Coquette Nails Last Longer
A beautiful manicure deserves a little extra care. Follow these simple tips to keep your Christmas nail art looking fresh:
- Prep your nails: Remove old polish, gently shape your nails, and clean the nail surface before applying polish.
- Use a base coat: It helps protect natural nails and improves polish adhesion.
- Apply thin layers: Two thin coats generally look smoother and dry more evenly than one thick coat.
- Seal the edges: Apply top coat over the free edge of your nails to help prevent chipping.
- Protect nail decorations: Use nail-safe adhesive for pearls and charms, and avoid catching raised decorations on clothing.
- Wear gloves: Use gloves when washing dishes or handling cleaning products.
- Moisturize regularly: Apply cuticle oil to keep the skin around your nails looking healthy.
If you’re using gel polish, follow the manufacturer’s curing instructions and avoid getting uncured product on your skin.
Conclusion
Christmas coquette nails are the perfect combination of sweetness, sparkle, and festive charm. From delicate pink bow designs and milky-white snowflakes to burgundy French tips and glittery pearl accents, there is a beautiful option for every style and nail length.
Whether you prefer a simple manicure or love detailed nail art, these 21 ideas make it easy to bring a little extra magic to your holiday look. Choose your favorite colors, add a few romantic details, and let your nails become part of your Christmas celebration.
Which Christmas coquette nail design is your favorite? Save your favorite ideas and show them to your nail artist before your next holiday appointment!
Frequently Asked Questions
1. What are Christmas coquette nails?
Christmas coquette nails are festive nail designs inspired by feminine, romantic details such as bows, pearls, lace, hearts, glitter, and soft pink shades. They often combine traditional Christmas colors like red, white, and burgundy with delicate decorative accents.
2. What colors are best for Christmas coquette nails?
The most popular colors include blush pink, baby pink, cherry red, burgundy, milky white, champagne, and silver. These shades create a soft, romantic, and festive appearance.
3. Can I get Christmas coquette nails on short nails?
Absolutely! Short nails look beautiful with simple designs such as tiny bows, polka dots, mini snowflakes, pink French tips, and small pearl accents.
4. What nail shape looks best with coquette nail art?
Almond, oval, and soft square shapes are especially popular. However, coquette designs can look lovely on almost any nail shape.
5. Are Christmas coquette nails suitable for everyday wear?
Yes! Choose subtle designs with sheer pink polish, tiny bows, and minimal pearls for a manicure that looks pretty without feeling too dramatic.
6. How can I make my Christmas nail art last longer?
Start with clean, properly prepared nails, use a quality base coat, apply thin polish layers, and finish with a protective top coat. Avoid excessive exposure to water and cleaning chemicals.
7. Can I create Christmas coquette nails at home?
Yes! Many designs are beginner-friendly. A dotting tool, fine nail-art brush, nail stickers, and a few festive polish colors are enough to create bows, dots, snowflakes, and simple French tips.
8. What accessories can I add to Christmas coquette nails?
Mini pearls, rhinestones, gold foil, glitter, metallic charms, and tiny bow stickers are all lovely options. Choose nail-safe decorations and secure them properly.