
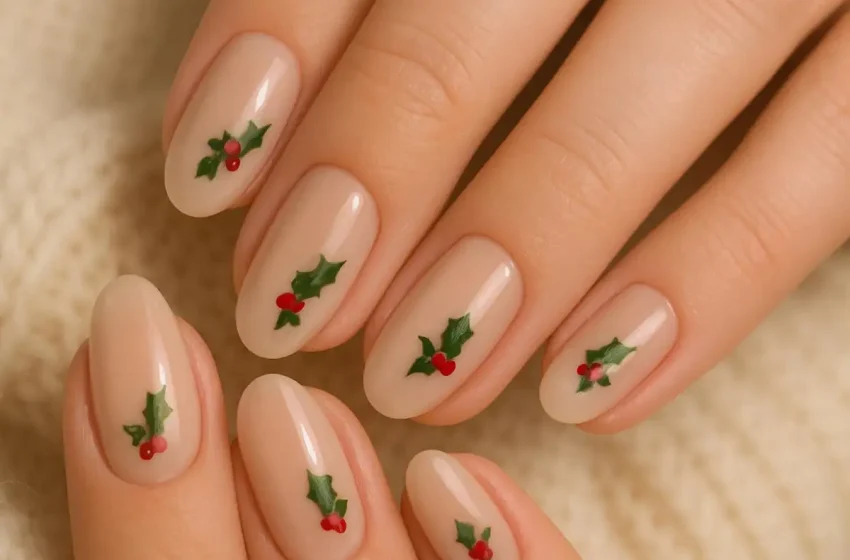
17 Elegant Christmas Nail Designs for a Classy Holiday Look
Christmas is the perfect time to give your nails a festive makeover, but holiday nail art doesn’t have to be loud, glittery, or over-the-top. If you love a polished and sophisticated look, elegant Christmas nail designs are a beautiful way to celebrate the season while keeping your manicure timeless.
Think soft nude shades, delicate gold accents, classic deep red polish, subtle snowflakes, shimmering champagne finishes, and graceful French tips. These designs bring just the right amount of holiday sparkle without losing their classy appeal. Whether you’re attending a Christmas dinner, enjoying a holiday party, or simply want your everyday manicure to feel special, there’s a style here for you.
In this collection, you’ll find 17 elegant Christmas nail designs that range from minimalist and understated to glamorous and festive. Each idea includes a simple step-by-step tutorial, so you can recreate the look at home or take it to your favorite nail technician.
1. Classic Red Christmas Nails
You can never go wrong with classic red nails during the holiday season. A rich cherry or deep cranberry shade looks timeless, sophisticated, and effortlessly festive. This manicure is perfect if you want a simple Christmas look that works with almost any outfit.
What you’ll need:
- Base coat
- Deep red nail polish
- Glossy top coat
- Nail file and buffer
- Cuticle oil
Step-by-step tutorial:
- Shape your nails into a soft almond or oval shape for an elegant finish.
- Gently buff the nail surface and apply a thin layer of base coat.
- Apply one thin coat of deep red polish and allow it to dry.
- Add a second coat for a rich, even color.
- Finish with a glossy top coat to create a smooth, salon-quality shine.
- Apply cuticle oil for a neat, hydrated appearance.
2. Nude Nails With Delicate Gold Stars
For a subtle holiday manicure, nude nails decorated with tiny gold stars are an excellent choice. The neutral base keeps the design understated, while the metallic details add a little Christmas magic.
What you’ll need:
- Sheer nude or beige polish
- Gold nail stickers or metallic gold polish
- Fine nail art brush or dotting tool
- Base coat and top coat
Step-by-step tutorial:
- File your nails into a soft square or almond shape.
- Apply a base coat and let it dry completely.
- Add two thin layers of nude polish.
- Use a fine brush or nail stickers to place tiny gold stars on one or two nails.
- Keep the remaining nails plain for a balanced look.
- Seal the design with a glossy top coat.
3. Milky White Snowflake Nails
Milky white nails create a soft, winter-inspired look that feels clean and luxurious. Add delicate snowflakes to a few nails for a festive touch that remains graceful rather than busy.
What you’ll need:
- Milky white nail polish
- White or silver nail art paint
- Fine liner brush
- Base coat
- Top coat
Step-by-step tutorial:
- Shape and buff your nails gently.
- Apply a base coat to protect your natural nails.
- Add two coats of milky white polish, allowing each layer to dry.
- Use a fine liner brush to draw small snowflakes on one or two accent nails.
- Add tiny dots around the snowflakes to create a falling-snow effect.
- Finish with a clear top coat for a smooth, glossy finish.
4. Burgundy Nails With Gold Foil
Burgundy is one of the most sophisticated colors for winter. When paired with delicate gold foil, it creates a rich, elegant manicure that looks especially beautiful for Christmas dinners and evening celebrations.
What you’ll need:
- Burgundy nail polish
- Gold nail foil
- Foil transfer gel or nail foil adhesive
- Base coat and top coat
- Tweezers
Step-by-step tutorial:
- Shape your nails into an almond or oval silhouette.
- Apply base coat and two coats of burgundy polish.
- Allow the polish to dry completely.
- Apply a small amount of foil adhesive to selected areas of one or two nails.
- Gently press tiny pieces of gold foil onto the adhesive using tweezers.
- Smooth the foil carefully and seal everything with a glossy top coat.
5. Champagne Glitter French Tips
French tips get a festive upgrade with champagne-colored glitter. This design is ideal if you love traditional French manicures but want something a little more special for the holidays.
What you’ll need:
- Sheer pink or nude polish
- Champagne glitter polish
- French tip guides or a thin nail art brush
- Base coat and top coat
Step-by-step tutorial:
- File your nails into a soft almond or square shape.
- Apply a base coat followed by two coats of sheer nude polish.
- Allow the base color to dry thoroughly.
- Use French tip guides or a thin brush to apply champagne glitter along each nail tip.
- Add a second layer of glitter if you want a more noticeable sparkle.
- Seal with a glossy top coat.
6. Emerald Green and Gold Accent Nails
Emerald green is a gorgeous alternative to traditional red Christmas nails. It feels festive and luxurious, especially when combined with subtle gold accents. This design looks beautiful with gold jewelry and winter outfits.
What you’ll need:
- Deep emerald green polish
- Gold metallic polish
- Fine nail art brush
- Base coat and top coat
Step-by-step tutorial:
- Shape your nails into a rounded square or almond shape.
- Apply a protective base coat.
- Paint most nails with two coats of emerald green polish.
- Choose one or two accent nails for a gold stripe, tiny star, or simple metallic detail.
- Keep the gold decoration delicate so the overall manicure remains balanced.
- Apply a glossy top coat to finish.
7. Minimalist Christmas Tree Nails
A tiny Christmas tree design is a sweet way to bring holiday spirit to your manicure without making it look too playful. A neutral base and fine green lines keep this nail art refined and modern.
What you’ll need:
- Nude or milky pink polish
- Forest green nail art polish
- Gold polish
- Fine liner brush
- Base coat and top coat
Step-by-step tutorial:
- Apply a base coat to clean, shaped nails.
- Paint two thin coats of nude or milky pink polish.
- On one accent nail, draw a small vertical line using forest green polish.
- Add short angled strokes on both sides to create a simple tree shape.
- Place a tiny gold dot at the top of the tree.
- Let the design dry before applying a clear top coat.
8. Soft Pink Nails With Pearl Details
If you prefer a feminine and understated manicure, soft pink nails with tiny pearl details are a lovely option. The gentle color looks polished, while the pearls add a delicate festive finish.
What you’ll need:
- Blush pink nail polish
- Small nail art pearls
- Nail glue or pearl-setting gel
- Dotting tool
- Base coat and top coat
Step-by-step tutorial:
- Shape your nails into a soft oval or almond shape.
- Apply a base coat and two thin layers of blush pink polish.
- Allow the color to dry completely.
- Add a tiny amount of nail glue or suitable embellishment gel to selected spots.
- Place one or two small pearls near the cuticle or along the side of an accent nail.
- Secure the decorations carefully and finish with top coat around the embellishments, avoiding heavy coverage over raised pearls if it dulls their finish.
9. Black Nails With Gold Christmas Details
Black nails can look surprisingly festive when decorated with fine gold details. This combination is dramatic, elegant, and perfect for anyone who prefers a modern holiday manicure over traditional Christmas colors.
What you’ll need:
- Glossy black nail polish
- Metallic gold nail polish
- Fine liner brush
- Base coat and top coat
Step-by-step tutorial:
- File your nails into a neat almond or square shape.
- Apply a base coat and two coats of black polish.
- Choose one or two nails for gold decorations.
- Use a fine brush to paint tiny stars, delicate lines, or small dots.
- Keep the designs minimal so the black base remains the main feature.
- Apply a high-shine top coat for a smooth finish.
10. Classic French Manicure With Red Tips
Red French tips are a beautiful way to add a Christmas twist to a classic manicure. The sheer neutral base keeps the nails looking clean, while the red tips add just enough seasonal color.
What you’ll need:
- Sheer pink or nude polish
- Deep red nail polish
- French manicure guides or liner brush
- Base coat and top coat
Step-by-step tutorial:
- Shape your nails into an almond or squoval silhouette.
- Apply a base coat and two thin layers of nude polish.
- Let the base dry fully.
- Use French tip guides or a fine brush to create thin red tips.
- Make sure the tip thickness is consistent across your nails.
- Finish with a clear glossy top coat.
11. Icy Silver Chrome Nails
For a glamorous winter look, icy silver chrome nails are hard to beat. Their reflective finish resembles fresh frost and looks especially striking under Christmas lights. Keep the shape simple to let the metallic effect stand out.
What you’ll need:
- Silver chrome nail powder
- Suitable gel base color
- No-wipe gel top coat
- Applicator sponge
- UV or LED lamp, if required by the gel system
Step-by-step tutorial:
- Shape and prepare your nails according to your gel system’s instructions.
- Apply the gel base color and cure it as directed.
- Apply the specified no-wipe top coat and cure for the recommended time.
- Rub a small amount of silver chrome powder over each nail using an applicator.
- Brush away excess powder gently.
- Seal with a compatible top coat and cure according to the product instructions.
12. Deep Green Velvet Cat-Eye Nails
Velvet cat-eye nails have a beautiful dimensional shimmer that resembles soft holiday fabric. A deep green shade gives the manicure a festive feel, while the shifting magnetic effect makes it look luxurious and eye-catching.
What you’ll need:
- Deep green magnetic gel polish
- Magnetic nail art tool
- Compatible gel base and top coat
- UV or LED lamp
Step-by-step tutorial:
- Prepare your nails and apply a compatible gel base coat.
- Cure the base according to the product instructions.
- Apply one thin coat of magnetic green gel polish.
- Before curing, hold the magnet above each nail to create a velvet-like shimmer effect.
- Adjust the magnet position until you like the light pattern, then cure.
- Apply another coat if needed, repeat the magnetic effect, and seal with top coat.
13. Cream Nails With Delicate Holly Leaves
Cream nails offer a warm and sophisticated alternative to bright white. A tiny holly design adds a traditional Christmas detail while keeping the overall manicure soft and elegant.
What you’ll need:
- Cream or ivory nail polish
- Dark green nail art polish
- Red nail art polish
- Fine liner brush
- Base coat and top coat
Step-by-step tutorial:
- File your nails into a soft oval or almond shape.
- Apply base coat and two coats of cream polish.
- Choose one accent nail for the holly design.
- Use a fine brush to paint two small green leaves.
- Add two or three tiny red dots beside the leaves to represent berries.
- Let the artwork dry before applying a glossy top coat.
14. Rose Gold Glitter Accent Nails
Rose gold glitter brings warmth and sparkle to a Christmas manicure. Instead of covering every nail in glitter, use it on one or two accent nails for a more polished and balanced finish.
What you’ll need:
- Sheer pink or nude polish
- Rose gold glitter polish
- Base coat and top coat
- Small detail brush, if needed
Step-by-step tutorial:
- Shape your nails into an almond or rounded square style.
- Apply a base coat and two coats of sheer pink polish.
- Choose one or two accent nails for rose gold glitter.
- Apply glitter in a thin, even layer, concentrating it near the tips or center.
- Add another layer only if you want a stronger sparkle.
- Seal the manicure with a smooth top coat.
15. White French Tips With Tiny Gold Bows
Gold bows are a charming holiday detail that can make a simple French manicure feel special. Combined with crisp white tips and a sheer nude base, they create a delicate, gift-inspired look.
What you’ll need:
- Sheer nude polish
- White nail polish
- Gold nail art polish or stickers
- Fine liner brush
- Base coat and top coat
Step-by-step tutorial:
- Prepare your nails and apply a base coat.
- Add two thin coats of sheer nude polish.
- Paint a neat white French tip on each nail.
- On one or two accent nails, use a fine brush to create a tiny gold bow.
- Add a small gold dot in the center of each bow.
- Seal the design with a glossy top coat.
16. Cinnamon Brown Nails With Gold Lines
Warm brown nails are a chic choice for anyone who loves neutral manicures. Cinnamon, mocha, and chocolate shades feel cozy and sophisticated, while fine gold lines add a festive touch.
What you’ll need:
- Cinnamon or chocolate brown nail polish
- Metallic gold nail polish
- Fine liner brush or striping tape
- Base coat and top coat
Step-by-step tutorial:
- Shape your nails into a soft square or almond style.
- Apply a base coat and two coats of brown polish.
- Allow the polish to dry thoroughly.
- Use a fine liner brush to add thin gold lines on one or two nails.
- Try a simple diagonal line, curved accent, or delicate geometric pattern.
- Finish with a glossy top coat for a refined look.
17. Milky Pink Nails With Subtle Snowfall Glitter
Finish your holiday manicure with a soft milky pink design decorated with delicate snowfall glitter. This style is romantic, graceful, and easy to wear throughout the winter season. Its subtle sparkle makes it especially lovely for Christmas celebrations.
What you’ll need:
- Milky pink nail polish
- Fine silver or iridescent glitter
- Small sponge or detail brush
- Base coat and top coat
Step-by-step tutorial:
- File your nails into a soft almond or oval shape.
- Apply a base coat and two coats of milky pink polish.
- Allow the base color to dry.
- Use a small sponge or detail brush to apply a light dusting of fine glitter near the tips.
- Add a few tiny glitter dots to create a soft snowfall effect.
- Finish with a clear top coat to smooth the surface and enhance the shine.
Conclusion
Elegant Christmas nail designs prove that holiday manicures can be festive while still looking classy and sophisticated. From timeless red polish and delicate gold stars to emerald green accents, milky white snowflakes, and shimmering champagne French tips, there are plenty of beautiful ways to celebrate the season.
If you prefer a minimalist manicure, choose nude shades, tiny metallic details, or soft pink finishes. For a more glamorous holiday look, try burgundy and gold foil, silver chrome, or deep green velvet nails.
The best Christmas manicure is one that matches your personal style and makes you feel confident. Pick your favorite design, add a little festive sparkle, and enjoy beautiful nails throughout the holiday season!
Frequently Asked Questions
1. What are the most elegant colors for Christmas nails?
Deep red, burgundy, emerald green, champagne gold, milky white, nude, blush pink, and silver are some of the most elegant Christmas nail colors. These shades create a festive appearance without looking overly bright or busy.
2. How can I make Christmas nails look classy?
Choose a simple color palette, keep nail art delicate, and avoid adding too many decorations to every nail. Minimalist stars, thin French tips, subtle glitter, and tiny metallic accents are excellent choices.
3. What nail shape looks best for elegant Christmas nails?
Almond, oval, and soft square shapes are especially flattering for elegant Christmas manicures. They create a neat, polished appearance and work beautifully with both minimalist and detailed nail art.
4. Are red nails good for a classy Christmas manicure?
Absolutely! Classic red is one of the most timeless holiday nail colors. Deep cherry, wine, and cranberry shades look particularly sophisticated with a glossy finish.