
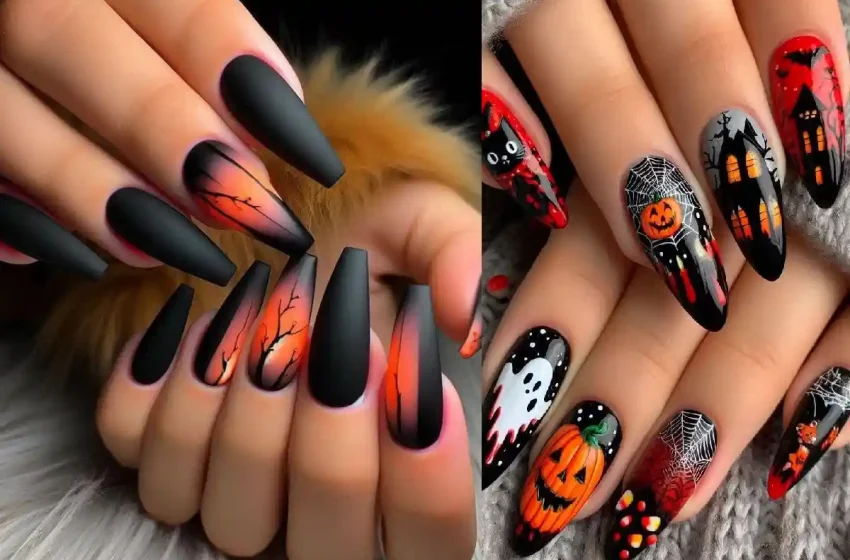
25 Acrylic Halloween Nails With Spooky Details
Halloween is the perfect time to make your manicure a little darker, bolder, and more creative. Acrylic Halloween nails give you plenty of space for dramatic shapes, intricate artwork, 3D charms, chrome finishes, spooky characters, spiderwebs, ghosts, pumpkins, and blood-drip details.
This year’s Halloween nail inspiration is especially versatile, ranging from elegant black-and-nude designs to full horror-inspired sets. Current ideas include ghosts, bats, spiderwebs, blood drips, chrome finishes, long coffin shapes, stiletto nails, and dimensional Halloween charms.
Whether you want something cute and spooky, gothic and glamorous, or seriously creepy, these 25 acrylic Halloween nail ideas will give you plenty of inspiration for your October manicure.

5
What You’ll Need for Acrylic Halloween Nail Art
Before starting, gather:
- Acrylic nail tips or an acrylic nail system
- Base coat
- Halloween-colored gel polishes
- Black, white, orange, red, purple and green polish
- Fine nail-art brush
- Dotting tool
- Nail file and buffer
- Matte and glossy top coats
- Rhinestones and glitter
- Halloween nail charms
- Builder gel for raised or 3D details
- UV/LED lamp if using gel products
For intricate Halloween artwork, a fine detail brush is especially useful for spiderwebs, tiny ghosts, bones and other miniature designs.
1. Black French Tips With Tiny Ghosts 👻
This is an elegant option for anyone who wants Halloween nails without going completely over-the-top.
How to Create It
- Apply a sheer nude or pink acrylic base.
- Shape the nails into coffin or almond tips.
- Paint a glossy black French tip.
- Add tiny white ghost shapes to two or three accent nails.
- Use a black dotting tool to create the ghost eyes.
- Draw delicate white spiderwebs on one corner.
- Finish with a glossy top coat.
The combination of negative space, black tips and tiny ghost artwork keeps the manicure festive while remaining wearable.
2. Orange & Black Pumpkin Coffin Nails 🎃
Orange and black are classic Halloween colors, and they look especially striking on long coffin-shaped acrylics.
How to Create It
- Apply black acrylic to several nails.
- Paint bright pumpkin-orange on the remaining nails.
- Add small jack-o’-lantern faces to selected nails.
- Draw spiderwebs using a thin white brush.
- Add tiny black bats or leaves.
- Apply orange glitter to one or two accent nails.
- Seal everything with a glossy top coat.
This color combination works particularly well with coffin-shaped acrylics because the longer surface gives you plenty of room for detailed artwork.
3. Bloody Drip Acrylic Nails 🩸
For a darker horror-inspired look, try glossy red blood dripping over a nude or black base.
How to Create It
- Start with a nude acrylic base.
- Paint a deep red French tip.
- Using a thin brush, pull several red lines downward.
- Round the ends of the lines to create realistic-looking drops.
- Add a few smaller drops around the main design.
- Use a high-shine top coat to create a wet appearance.
Glossy red drips over a clean nude base are a popular way to make Halloween nails dramatic without covering every nail in dark polish.
4. Matte Black & Glowing Orange Nails 🖤
Matte black acrylics paired with glowing orange accents create an elegant spooky effect.
How to Create It
- Apply a black acrylic base.
- Shape the nails into long coffin tips.
- Apply matte top coat.
- Paint orange ombré onto two accent nails.
- Add black branch silhouettes over the orange.
- Leave the remaining nails completely matte.
- Add small glossy details for contrast.
The contrast between matte black and bright orange gives this manicure a sophisticated Halloween appearance.
5. Spiderweb & Spider Charm Nails 🕷️
Spiderwebs are one of the easiest Halloween motifs to customize.
How to Create It
- Apply a nude, burgundy or black base.
- Use a fine brush to draw three or four lines from one corner.
- Connect the lines with curved strokes.
- Add a tiny black spider in the center.
- Place a small metallic spider charm on one accent nail.
- Add rhinestones around the charm if desired.
- Finish with a glossy top coat.
For an extra-dimensional look, raised spider details can be sculpted with builder gel or acrylic.


6. Haunted House Acrylic Nails 🏚️
Turn your nails into miniature haunted landscapes.
How to Create It
- Paint the nails charcoal gray or deep purple.
- Add a black silhouette of a crooked house.
- Paint tiny yellow windows.
- Add bare tree branches around the house.
- Create a small moon behind the building.
- Add tiny bats across the sky.
- Finish with a matte top coat.
This design looks especially impressive on long almond or coffin acrylics.
7. Purple Chrome Witchy Nails 💜
Purple chrome gives Halloween nails a magical, mysterious finish.
How to Create It
- Apply a deep purple gel base.
- Cure according to your product instructions.
- Apply chrome powder for a metallic effect.
- Add black crescent moons.
- Paint tiny stars around the moons.
- Add a few silver rhinestones.
- Seal the design carefully.
Purple chrome paired with moons, stars and dark accents creates a witchy aesthetic that feels glamorous rather than overly cartoonish.
8. Ghost Face Accent Nails 👻
Create a spooky ghost-inspired accent without decorating every nail.
How to Create It
- Apply glossy black acrylic to most nails.
- Paint one or two accent nails white.
- Create a ghostly face using black detailing.
- Add tiny red or gray accents.
- Finish the black nails with a glossy top coat.
- Use matte top coat on the white accents for contrast.
9. 3D Skull Charm Nails 💀
For maximum Halloween drama, add dimensional skull decorations.
How to Create It
- Apply black or burgundy acrylic.
- Paint spiderweb details onto two nails.
- Attach a small skull charm to one accent nail.
- Add silver rhinestones around the charm.
- Paint tiny bone details on another nail.
- Secure all raised decorations with appropriate nail adhesive or gel.
- Finish the surrounding artwork with top coat.
3D charms are particularly effective on acrylic because the sturdy extension provides a larger canvas for statement decorations.
10. Black & Red Vampire Nails 🧛
Deep red and black make an instantly dramatic vampire-inspired combination.
How to Create It
- Apply glossy black acrylic.
- Add deep burgundy to two accent nails.
- Paint tiny vampire-fang shapes.
- Add red drip details near the tips.
- Place small silver studs around selected accents.
- Finish with a glass-like glossy top coat.
11. Mummy Wrap Nails 🧟
Mummy nails are creepy, cute and surprisingly easy to create.
How to Create It
- Paint the nails ivory or off-white.
- Draw uneven black or gray lines across the nail.
- Leave small gaps between the lines.
- Add two black eyes on an accent nail.
- Add tiny gray shadows for dimension.
- Finish with a glossy top coat.
For a more realistic mummy effect, slightly curve the wrap lines instead of making them perfectly straight.
12. Black Cat Halloween Nails 🐈⬛
Black cats make a perfect Halloween manicure motif.
How to Create It
- Apply a nude or smoky-gray base.
- Paint small black cat silhouettes.
- Add pointed ears.
- Use tiny white or green dots for glowing eyes.
- Add miniature stars or moons around the cats.
- Finish with glossy top coat.
13. Neon Green Toxic Potion Nails ☠️
Bright green creates a fun toxic-potion effect against black acrylic.
How to Create It
- Apply a glossy black base.
- Paint neon green French tips.
- Add green dripping effects.
- Paint tiny bubbles using a dotting tool.
- Add miniature potion-bottle details.
- Use chrome or glitter around the edges.
- Finish with a glossy top coat.
14. Skeleton Bone Nails 💀
Create a miniature skeleton design across several nails.
How to Create It
- Apply a matte black base.
- Use a fine white brush to draw bones.
- Create small finger-bone shapes on one nail.
- Add a tiny skull to another.
- Use gray polish to create subtle shadows.
- Finish with matte top coat.
15. Witch Hat & Moon Nails 🌙
Perfect for a cute witchy Halloween manicure.
How to Create It
- Start with a deep purple acrylic base.
- Paint tiny black witch hats.
- Add crescent moons.
- Draw tiny stars.
- Add silver glitter around the celestial details.
- Finish with glossy top coat.
16. Candy Corn Acrylic Nails 🍬
Bring a playful Halloween feel to your manicure with candy-corn colors.
How to Create It
- Apply a nude base.
- Divide the nail into three sections.
- Paint white near the cuticle.
- Add orange in the middle.
- Finish the tip with yellow.
- Add a small glitter accent.
- Seal with glossy top coat.
Candy-corn-inspired color blocking remains a recognizable Halloween manicure idea and can be adapted to acrylic tips.
17. Gothic Rose & Spiderweb Nails 🥀
Dark roses can make Halloween nails feel romantic and gothic.
How to Create It
- Apply black or deep burgundy acrylic.
- Paint small dark-red roses.
- Add thin black leaves.
- Draw spiderwebs around selected roses.
- Add tiny silver studs.
- Finish with a glossy top coat.
18. Orange Chrome Halloween Nails ✨
If you want something trendy rather than traditionally spooky, choose metallic orange.
How to Create It
- Apply orange gel polish.
- Cure thoroughly.
- Apply orange or gold chrome powder.
- Buff until the surface looks metallic.
- Add small black bats or pumpkins.
- Finish with a high-shine top coat.
Chrome finishes can turn a familiar Halloween palette into a more modern manicure.

19. Haunted Graveyard Nails 🪦
Create a miniature cemetery across your fingertips.
How to Create It
- Paint a dark gray or black base.
- Add tiny gray tombstones.
- Paint crooked tree branches.
- Add a pale moon.
- Create small bats flying across the background.
- Add tiny crosses or grass details.
- Use a matte top coat.
For a luxe version, tiny gold accents can be added to tombstones or celestial details.
20. Stiletto Blood & Web Nails 🩸🕷️
Long stiletto acrylics are perfect for an intense Halloween look.
How to Create It
- Sculpt or apply long stiletto acrylics.
- Paint several nails black.
- Add deep-red sections to the remaining nails.
- Draw spiderwebs with a fine brush.
- Add red blood-drip details.
- Attach a tiny spider charm.
- Finish with glossy top coat.
Because stiletto nails are sharp and long, this dramatic style is better suited to special occasions than everyday activities.
21. Cute Pumpkin & Ghost Nails 🎃👻
For a softer Halloween look, combine smiling pumpkins and tiny ghosts.
How to Create It
- Start with a nude or light-pink acrylic base.
- Paint small orange pumpkins.
- Add white ghosts beside them.
- Use black dots for facial details.
- Add tiny stars and hearts.
- Finish with glossy top coat.
This style is especially good if you want your Halloween manicure to feel festive rather than frightening.
22. Black Widow Inspired Nails 🕷️
Make one large spider the focal point of your manicure.
How to Create It
- Apply black or dark red acrylic.
- Paint a large black spider on one accent nail.
- Add thin legs using a detail brush.
- Place a red rhinestone on the spider’s body.
- Draw delicate webs on neighboring nails.
- Finish with a glossy top coat.
23. Halloween Flame Nails 🔥
Spooky flames can make long acrylic nails look bold and edgy.
How to Create It
- Apply a black base.
- Paint orange flames from the tips upward.
- Add red inside the orange flames.
- Highlight small sections with yellow.
- Add tiny black bats between the flames.
- Finish with a glossy top coat.
Long coffin nails provide enough surface area for colorful flame artwork, making them particularly effective for statement Halloween sets.
24. Blood Moon Gothic Nails 🌑
Create a dramatic celestial Halloween manicure.
How to Create It
- Apply a matte black acrylic base.
- Paint a deep-red circular moon.
- Add black tree branches across the moon.
- Paint tiny bats around the moon.
- Add small silver stars.
- Finish selected details with glossy top coat.
The mixture of matte black, deep red and metallic details gives this design a mysterious gothic feel.
25. Ultimate 3D Halloween Nail Set 🎃💀🕷️
If you want maximum Halloween drama, combine several spooky elements into one manicure.
How to Create It
- Choose long coffin or stiletto acrylics.
- Use black, nude, orange, white and red as the main palette.
- Add a pumpkin to one nail.
- Create a ghost on another.
- Paint a spiderweb on a third.
- Add a 3D spider or skull charm to an accent nail.
- Add blood-drip details to another nail.
- Finish with a combination of matte and glossy textures.
A mixed set works best when you repeat the same colors throughout the manicure so that the individual designs still look cohesive.
Tips for Making Acrylic Halloween Nails Last Longer
A beautiful Halloween manicure needs good preparation and aftercare.
1. Prepare the Nail Properly
Clean the nails, gently prepare the cuticle area and lightly buff the natural nail before applying acrylic.
2. Don’t Overload the Nail With Charms
Large charms look great, but too many can make the set feel crowded and can interfere with everyday activities.
3. Protect Your Artwork
Use an appropriate top coat over finished nail art. Glossy finishes are particularly effective for blood drips and chrome effects, while matte finishes work beautifully with gothic and bone designs.
4. Be Careful With Water
Repeated exposure to water can contribute to lifting. Gloves can help when doing household chores.
5. Never Pick or Peel Acrylic Off
Have acrylic enhancements removed professionally or follow proper soak-off/removal procedures for the specific product system. Improper removal can damage the natural nail.
How to Choose the Best Halloween Acrylic Nail Design
For a cute look: Choose ghosts, pumpkins, candy corn or black cats.
For a gothic look: Try black roses, blood drips, burgundy, matte black and silver details.
For a glamorous look: Choose chrome, rhinestones, metallic charms and glossy finishes.
For a creepy look: Go for realistic spiders, skulls, bloody effects and haunted graveyards.
For everyday wear: Keep most nails simple and use only one or two detailed accent nails.
For Halloween parties: Long coffin or stiletto acrylics with 3D charms make the biggest statement.
Conclusion
Halloween acrylic nails are the perfect way to experiment with bold shapes, spooky artwork and dramatic finishes. From tiny ghosts and delicate spiderwebs to bloody drips, haunted houses, chrome finishes and 3D skull charms, there is a design for every Halloween personality.
If you want something wearable, try nude acrylic with black French tips and tiny ghosts. If you’re ready to go all out, combine coffin or stiletto extensions with pumpkins, spiders, blood drips, chrome and 3D decorations.
The best part is that you don’t have to choose just one Halloween theme. Mix your favorite spooky details while keeping a consistent color palette for a manicure that feels creative, polished and completely Halloween-ready.
FAQ
1. Are acrylic nails good for Halloween nail art?
Yes. Acrylic extensions provide a sturdy, larger canvas for detailed artwork, longer shapes and decorations such as charms and sculpted details.
2. What are the best colors for Halloween acrylic nails?
The classic choices are black, orange, red, white and purple. Deep burgundy, neon green, chrome and silver are also excellent for creating more unusual Halloween designs.
3. Which Halloween nail design is easiest for beginners?
Black French tips with tiny ghosts, simple spiderwebs, pumpkin faces and blood-drip tips are among the easiest designs to recreate.
4. Can I add 3D charms to acrylic nails?
Yes. Acrylic nails are particularly suitable for statement decorations, although charms should be properly secured and shouldn’t interfere with normal activities.
5. Are long coffin nails good for Halloween?
Absolutely. Coffin nails provide a large, flat canvas for pumpkins, haunted houses, spiderwebs, flames and other detailed artwork.